Monday, 31 July 2017

23 Content Creation Tools Every Affiliate Marketer Needs


 Are you spending way too much time on creating content for your site/ social media/marketing campaigns?
Content creation takes up huge chunks of time for most affiliate marketers. Unfortunately, there is no way around this.
However, there are definitely some great content creation tools that can make life much easier for you.

These are some of my most-used tools. I've separated them into categories to make it easier to find the type of tool you need the most. 

Tools For Generating Ideas

If you're running low on ideas for content and don't know where to look, these tools are worth checking out. 

1. Portent Title Maker

This is one of my favorite tools, purely because it's so much fun and often makes me laugh.
Enter a keyword to see a suggestion for a blog post title. If you don't like it, hit refresh to get a new title.
Usually, I don't use the exact titles suggested by Portent, but use them as ideas for writing future posts. Try it! 
portent title maker

2. Buzz Sumo

Buzz Sumo is a great tool to understand and analyze what content is working in your niche. Enter a topic to see what sort of content others are writing, what is getting shared on social media and more. It's a handy tool when you have a topic but are stuck on which direction to take. Buzz Sumo can help you find the right angle.

3. Blog Topics Generator

Hubspot also has a blog topic generator that I find very useful. It works in a similar way to the Portent tool. Enter in three keywords, and the tool will return five topic ideas for you to work with.
hubspot blog title generator

Tools For Writing 

Make your content writing better and error-free with these web content creation tools. 

4. Hemingway

The key to writing good content that engages your users? Keep it simple. But this is often easier said than done. 
Most of us get caught up in long sentences and complicated words. Hemingway is a great tool to help you simplify your writing. It points out complex sentences and other common errors. Simply paste in your content to see what the app thinks.
hemingway app

5. Grammarly

Don't trust yourself to proofread your own work? Grammarly helps you by catching your grammatical errors before hit the Publish button. No more silly typos! 

6. WordPress Distraction-Free Editor

Most of you are probably using WordPress as your site's CMS. However, I find that sometimes the sidebars and everything else on the page can be pretty distracting. Add some Zen to your writing space by using the built-in distraction-free editor. Simply hit the four-way arrow icon to eliminate everything but the content area of the post .
wordpress distraction free wrtign

Tools For Visual Content

Visual content is the king of content marketing. Here are some great tools to help you create quality and engaging visual content with ease. 

7. Canva

I'm no designer, so a tool like Canva has made life SO much easier for me. There are pre-made templates, social media-ready images and lots of funky fonts. The best part is the drag and drop interface means you never have to worry about understanding Photoshop layers again. 
Other similar tools include Pablo by Buffer and PicMonkey.
canva

8. Infogr.am

If you like to create infographics, and other data visualization charts, Infogr.am is your tool. 

9. Giphy

GIFs rule the internet. Find the perfect GIF for every emotion on Giphy.
I spend way too much time on this site. You probably will too, once you discover they have GIFs for everything from your favorite TV shows and movies to fashion and food. And your favorite celebrities.  

10. Jing

Jing is my favorite tool for taking screenshots (e.g., the ones in this article). You can add arrows, highlight and circle parts of the image. You can also record videos of your screen (useful for instructional videos). You can then upload it and share the link with others, or save the file to your computer and add it to blog posts (like I have). 
Camtasia is another popular tool in the same category. You can create high-quality videos of your screen and easily upload videos from your hard drive as well. 

11. Meme Generator

No matter how many memes you see online, they never stop getting funny. If you want to create your own memes, this is the tool you should be using.
meme generator

Tools For Getting Help

If you find you're running out of time to create the content you want and need, have you considered getting help?
By help, I mean finding a freelancer who can help you fill the gaps. This could mean finding a writer to help you keep your blog up to date or a talented designer who will create that infographic that has been on your mind for a while. You could even find someone to do all your instructional videos. 
Whatever you need, it's likely there's a freelancer who can help you out. 
upwork categories
Some popular places to find the freelancers you need include:
12. Upwork (formerly known as oDesk. Elance has also merged into Upwork.)
13. Fiverr (All jobs done for $5, but you can pay for extras, too.) 
15. 99designs
17. Visual.ly (This one is great for infographics.)

Tools For Social Media Content

Spending a lot of time creating social media content? To be honest, there are so many social media tools out there that it would probably take me all day to list them. I like two pieces of software for content creation. They help me create better content, but also more of it. 

18. Buffer

There are a lot of social media scheduling tools out there, but Buffer is one of my favorites these days. It's an especially good tool for adding third party/curated content to your social media feeds. 
You can share to Twitter, Facebook, Google+ and LinkedIn with the free plan. Definitely download the Chrome plugin for Buffer. That way, every time you find a piece of content you think your audience will enjoy, simply hit the button and it goes into your Buffer feed. 

19. Twitshot

Tweets with images definitely get more attention than text-based tweets alone. But until I discovered Twitshot, it was quite a painful process to do this. You had to manually save each image from an article and then upload it as a Twitter image.
Twitshot simplifies this process so much. Just add the link in and it will give you a selection of images from the article to add to your tweet. Plus it integrates with Buffer, which makes life even easier. 
twitshot   twitshot 2

Other Useful Content Creation Tools

20. Evernote

Evernote is the perfect tool to collect and curate all your ideas in one place while you put a piece of content together. You can add text, images, video, screen grabs, hyperlinks and more. I find it very useful at the research and draft stage of writing any piece of content. It's also great for creating checklists, saving links from the web, and more. 

21. Audacity

If you're a podcaster, Audacity is an excellent tool for recording, editing and publishing your podcasts. 

22. Prezi

Easily create presentations that are visually appealing and engaging. Plus it syncs with all your devices, so you can create on the go and share when you're ready. 

23. List.ly

Lists work very well online. List.ly allows you to easily create lists and add them to your blog. You can also make it a crowd-sourced list, so your readers can add to it and your list keeps growing. 
Regularly creating content is hard work, there's no doubt about that. So put these content creation tools to work for you and make your life a little bit easier. 
Of course I haven't managed to list every content creation tool available. There are thousands! Let me know if you have a favorite and tell me it helps with your content creation process. 

The Complete Guide to Email Automation for Beginners


If you’re a marketer, you’ve probably heard of email marketing automation.

Email marketing automation is an essential part of building a profitable email list for any online business.

In this article I’ll try to cover some important points:
  1. How does email automation work? 
  2. What type of events trigger automation? 
  3. The main terms you need to know before getting started 
  4. Email marketing automation tools 

If you are unsure of everything email automation can do for you, then read on…


How does email automation work?

With email automation, when an event happens, an email is triggered (automatically sent). The email is sent from your email marketing tool or from your marketing automation tool.

The relevance of the email, and its timing is important. With a bit of smart automation, you can send the right email at the right time and to the right person, with information that is relevant to them, based on the actions they take on your website.

Another important thing is cleaning your email list. By doing so, you know that the email addresses are real and still active. Read more about how to clean your email list here.


What type of events trigger an automation

Below are some simple examples to understand what I am talking about:
  • Email after someone signs up to your email list 
  • Email when a website visitor is a previous subscriber – When someone is an email subscriber and visits your website, some email marketing tools can track which pages they have visited on your website and then trigger an email based on this. 
  • Survey response – You sent an email to your subscribers and asked them if they were interested in a product. Based on their answer, a different email (or series of emails) is automatically sent. 
  • Cart abandonment email – If you collect the email address of the person during the sales process – or if you already have the email address as the customer is an existing subscriber – you can follow up via email to encourage them to come back. 
Did you know that the average cart abandonment rate for e-commerce providers is over 60%. More than half of shoppers abandon their purchase after adding products to their cart.


What are the main terms you need to know before you start with email automation?

Before you get started with email automation, you need to get familiar with some of the most used terms of email marketing:
  • Opt-in/Subscribe – when someone opts in to receive emails from you 
  • Double opt-in – when someone opts in to receive emails from you and they need to confirm their opt-in 
  • Spam – when someone doesn’t opt-in and you send them emails, or when someone does optin and you overdo it 
  • Unsubscribe – when someone unsubscribes from your email list 
  • Trigger – describes an event that causes something to happen (an email is sent) 
  • Sequence – the sequence of emails that are sent after an event happens 
  • Email campaign/Autoresponder – a series of emails that are sent for a specific event 
  • Bounce rate – the rate at which emails are not delivered. A soft bounce is temporary, but a hard bounce is permanent and means that your message can never be delivered to that email address. 
  • CTR – stands for Click-Through-Rate and is the number of times people click on links within an email 

Email marketing automation tools

The main difference between an email automation tool and a basic email marketing tool, is the functionality and the price. An email marketing tool is used for sending regular emails such as newsletters. With a marketing automation tool you can build automation around those emails.

Some features of a marketing automation tool are:
  • email sequence builder 
  • landing page builder 
  • analytics 
  • program management – manage marketing campaigns across multiple channels 
  • online behavior tracking – email subscribers visiting your website 
  • and more. 

If you’re looking for a marketing automation tool, you have a large variety to choose from.

Here are some popular examples: 

  • ConvertKit – designed specifically for bloggers 
  • GetResponse – growing functionality, but not as powerful as some of the other tools below 
  • InfusionSoft – complex to use but very powerful 
  • Ontraport – doesn’t integrate with as many products as InfusionSoft does 
  • HubSpot – very useful and comprehensive tool, but the price will be higher compared to the other two 


What are the steps for building an email automation sequence

For any sequence that you want to build, the required steps will be similar.


1. Find out who you want to attract


Start by analyzing the customers who have bought from you in the past and try to figure out what are the characteristics and interests of your customers.


2. Do some research about the issues of your existing customers/audience


The next step is to do some research and find out the issues your customers/audience encounter while using your services/product. Doing that will help you come up with an incentive for people to subscribe to your services/product.


3. Use the info collected and create your incentive


Use the information from the above steps to create a buzz around that topic. You could also create a guide as a solution or use the info in your opt-in message. This will get people to sign up and then all you have to do is to offer them a free trial of your product.


4. Direct people to make the action you want them to make


You need to create some sort of a “map”, to think in advance. First you have a welcome email, then some follow-up emails with links to the guide created in the step above. After that, what should they do?
They could become a customer, so you must move them to a customer list
If they don’t become customers, you can move them to a newsletter list

A tool you can use for that is Lucidcharts.


5. Create your emails


When you’re creating the emails, think about the relationship you want to build with the subscriber. Make them feel welcome, as part of the community, tell them about yourself and deliver your promises (free trial, a guide, etc.).

With every email you send, make sure that you are building a relationship as well as providing quality content.


6. Create the sequence in the email automation tool


You will need to create a sequence, add emails to that sequence and then specify when the emails will be sent.

An example:
Welcome email – send immediately
Email no.2 – 2 days later
Email no.3 – 4 days later
Free trial/discount offer – 5 days later
Offer reminder – 6 days later
Add them to a customer list if they bought, or to a newsletter list if they didn’t

*days are counted after the welcome email is sent

Note: Your series of emails will be different depending on the type of service you provide and who you are targeting.


7. Deploy your opt-ins and segment your audience


Now you can setup the opt-ins on your site. Depending on the marketing tool you use, you might have the functionality and opt-ins required, but it’s always better to use a specialized tool.

OptinMonster has some smart functionalities and it also provides multiple ways to collect opt-ins.

Some examples of OptinMonster functionalities:
opt-ins based on your blog categories; this means that you can segment people based on where they opted in.
different opt-ins based on the page they visit
different opt-in based on their location
different opt-in based on their actions (abandon the cart or product purchase)
A/B testing for different opt-ins


8. Drive traffic to the opt-ins


Now that everything is in place, it’s time to drive some traffic to the opt-ins. This could be organic traffic, referrals from other sites, paid traffic from Google, Bing, Facebook Ads, etc.


9. Analyze and optimize your results


Measure what works and optimize it. To improve your opt-in rate you can change the words, the opt-in style or the incentive.

The same thing is available for your email sequence: if you notice that people are not opening your emails, you can test different subject lines. Keep in mind that the way you communicate with your new email subscribers needs to be completely different to the way you communicate with existing customers. You will need to split these two out.
Wrap

Successfully segmenting your email list guarantees that messages are landing in the right inbox at the right time.

You can educate. You can connect. You can sell.

Remember, the number one rule of email marketing automation is to keep your users’ experience as your top priority, so think outside of the (in)box!

Sunday, 30 July 2017

Social Media Invite Emails That Are a Marketing “Do”


 Facebook, Pinterest, Twitter, YouTube, Instagram, the list of social media networking sites continues to grow. And, once you’ve created your account on the latest social network, or even if you have an established account, how do you get people to find it? Email marketing, of course! Sending an email invitation asking readers to follow your business on a social network may not seem intuitive, but it can be an effective and easy way to grow your following. Your email list is full of people interested in your biz, and getting them to interact with you on social media can help build your relationship with them and keep your business top of mind.
Before we jump into some excellent social media email invite examples, here are a few tips for creating an effective invite. Now it may seem obvious, but always make sure (in any email you send) to include a link and/or a call-to-action button that entices readers to follow you. Also, make sure the email is:
  • Informative – Let your readers know what they’re going to get or find if they do start following your business on social.
  • Easy to read – Remember to include all the social sites you’re on and link to each one – Some people prefer different social sites.
  • Short – Just like any invitation, give important info, make the copy fun and personable and that’s it. Keep readers focused.
Now that we’ve discussed some tips, let’s take a look at a few “do” examples:
The Container Store – The Container Store’s social invite email focuses purely on their social networks, so it’s easy for readers to know what to do. It’s short, fun and shares the different things one can expect to find at each social site (i.e., time-saving tips). Plus, they include calls-to-action in the form of a “Go” button!
Social Email Invites are a Marketing Do
Zulily – Zulily created a charming graphic for their social invite email email which calls out each of their social networks. They also have a catchy headline: “Calling all social butterflies.” Plus, they provide a compelling reason to follow them on each social site (i.e., get inspired, share & shop).
Social Email Invites are a Marketing Do
CETFA – This non-profit included a single, funny and attention-grabbing image in their social invite email. They share their new social sites, plus the ones they’re established on and they give reasons why to follow them on each one.
Social Email Invites are a Marketing Do
The most important thing to keep in mind when creating a social media invite is to answer the following questions: “How can I provide value to my readers and followers?” and “What’s in it for them?” Then, keep followers coming back for more with engaging posts and conversations.
Looking for a little more on this subject? Jay Baer, the social media guru and author of the best-selling book Youtility, has a popular keynote entitled Why Email is Madonna and Facebook is Lady GagaBaer talks about how email and Facebook marketing are really very similar. Check it out for more inspiration.
Have you used email invitations to grow your following on social media? Share your experiences or invites in the comments.

4 Ways to Build Facebook Lookalike Audiences to Expand Your Targeting


 Do you want to reach more consumers with your Facebook ads?
Looking for creative ways to reach more people like your ideal customers?
Lookalike audiences allow you to build new audiences using an established source audience such as people who have viewed your video or previously purchased from you.
In this article, you’ll discover how to use Facebook lookalike audiences to successfully scale your ad targeting.
What Are Facebook Lookalike Audiences?
Facebook lookalike audiences are an advanced targeting option that goes beyond the basic interest and demographic targeting functionality. They’re currently the most effective Facebook targeting tool to find your ideal customer.
At the core of all lookalike audiences is a source audience upon which you build a lookalike audience. Facebook takes all of the data points of your source audience and finds new, similar people using a set percentage sample (which you specify) of the population in your chosen country.

Unlike interest-based targeting, lookalike audiences allow you to create the source audience, giving you more control. As a result, you end up with better-quality audiences because you can find new audiences that are almost identical to your existing ones.
Lookalike audiences are best used to target new cold audiences at the top of your sales funnel. For example, you could run top-of-funnel content campaigns to all of the lookalike audiences you build. This would start to warm them up as you take them from the top of the funnel to the bottom.
Now let’s look at how to create four types of lookalike audiences.

#1: Create a Video Lookalike Audience

Facebook users watch 100 million hours of video on the platform every day, so it should come as no surprise that video is Facebook’s best-performing content.
Video allows you to build brand recognition and trust with your target audience quickly. If you’re running a video-based content strategy and want to scale your campaigns to reach more people, lookalike audiences let you find new people based on those who’ve already watched your videos.

Before you can create a video lookalike audience, you first need to create a custom video audience, which will be the source audience for the lookalike.
Create a Custom Video Audience
Custom video audiences allow you to segment your viewers based on what videos they’ve watched and their level of engagement.
To create a custom video audience, open your Facebook Ads Manager and navigate to the Audiences dashboard. To do that, click the menu button and click All Tools.

Under Assets, click Audiences.

Next click Create Audience and select Custom Audience from the drop-down menu.

In the pop-up box that appears, you’ll see four custom audience options. Select Engagement on Facebook.

Next select Video.

You’ll see the box where you create your custom video audience. Select your engagement criteria from the Engagement drop-down list and choose the videos from which you want to build your audience.

Define the time periodgive your audience a name, and click Create Audience.

You can create an audience for all video views at every engagement level: 3 seconds, 10 seconds, 25%, 50%, 75%, and 95%. To create each one, repeat the process outlined above for the different engagement options.
Build a Video Lookalike Audience
Now you’re ready to create your video lookalike audience. Navigate to the Audiences dashboard in your Ads Manager just like you did when you created the custom video audience. Then click Create Audience and select Lookalike Audience from the drop-down menu.
In the Create a Lookalike Audience box, you’ll see three fields: Source, Country, and Audience Size. For the source, select the custom video audience you created in the previous step.

Next choose your country. This is typically the country in which the majority of your source audience is located. For example, if you work predominantly with UK-based businesses, any lookalike audience you create will be in the UK.

Finally, select your audience size. Audience sizes range from 1% to 10% of the total population in the country you choose, with 1% being those who most closely match your source. You may want to start at 1% and increase the audience size when you want to scale campaigns to reach more people.
When you’re finished, click Create Audience. You’ll receive a notification when your lookalike audience is ready to use, which could take up to 30 minutes.

#2: Set Up Email List Lookalike Audiences

Email-based lookalike audiences often deliver the best results. Why? Because you can take your existing customer list and use that as the source for your lookalike audience, essentially cloning your customer base.
As with video lookalike audiences, first you’ll need a custom email audience of your subscribers/customers before you can create an email-based lookalike audience.
Create a Custom Email Audience
Navigate to the Audiences dashboardclick Create Audience, and select Custom Audience from the drop-down menu. In the first pop-up box, select Customer File.

You have two options for adding your email data: upload your data as a file/copy and paste the data, or import it from MailChimp. If you’re uploading your email list, click Choose a File or Copy and Paste the Data.

Next upload the email list (which is a CSV file in the example).

Then map your identifiers. The more identifiers you use the better match rate you’ll see. In the example, we’ll use First Name, Last Name, and of course, Email Address.

After you click Upload & Create, you’ll see a progress bar and how many rows of data were successfully uploaded.
Now under Next Steps, click Create a Lookalike Audience.

Build an Email Lookalike Audience
In the Create a Lookalike Audience box that opens, you’ll see your custom email audience in the Source field.
Select your target country (from which the majority of your email list comes) and choose the audience size. Consider starting with a 1% lookalike audience and scaling from there. Then click Create Audience.

#3: Create Conversion Lookalike Audiences

Conversion lookalike audiences let you find new target audiences using a website custom audience of people who have completed a specific conversion event.
For example, if you’re an ecommerce business running a discount code lead magnetcreate a website custom audience of people who have triggered a lead event action by opting in for the discount code. Then use that audience as the source for your lookalike audience.

Before you can create the source audience for your conversion lookalike audience, make sure that you’ve set up and installed conversion tracking.
As with video and email lookalike audiences, you need to create the source audience first. It will be a website custom audience of people who have completed a specific event action.
Create a Website Custom Audience for Conversions
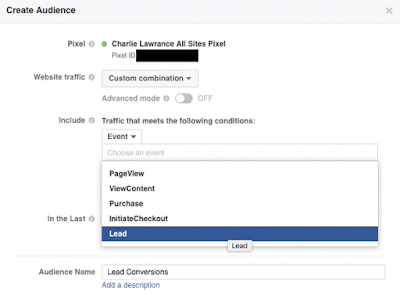
In the Audiences dashboard in your Facebook Ads Manager, click Create Audience and select Custom Audience from the drop-down menu. In the pop-up box, select Website Traffic.

From the Website Traffic drop-down menu, select Custom Combination.

Click the URL drop-down menu and select Event.

Choose the event you want to create the audience from (Lead, for example). You’ll see a list of event actions you’re currently tracking using the Facebook pixel.

In the field called In the Last, enter the time parameter for how long people will stay in your audience once they’ve completed the specific action. For example, you might choose 120-180 days to have the maximum number of people in your audience.
Finally, make sure the Include Past Website Traffic box is selectedgive your audience a name, and click Create Audience.
Build a Conversion Lookalike Audience
Now navigate to the Audiences dashboardclick Create Audience, and select Lookalike Audience from the drop-down menu.
In the Create a Lookalike Audience box, choose your website custom audience from the Source drop-down list.

Then select your country and choose the audience size (1% is a good place to start).
Finally, click Create Audience and wait for Facebook to build your lookalike audience. Once it’s ready to use, you’ll receive a notification and it will appear in your Audiences dashboard.

#4: Construct Page Likes Lookalike Audiences

Lookalike audiences for page likes are the easiest to set up because you build them from the fans of your Facebook page. If you have a large number of Facebook fans who actively engage with your organic posts, a page likes lookalike audience is a great way to find new similar target audiences.
Differing from the three lookalike audiences above, you don’t need to create a custom audience for your source audience.
In the Audiences dashboard in Facebook Ads Manager, click Create Audience and select Lookalike Audience. In the Create a Lookalike Audience box, select your page name from the Source drop-down list.

Then choose your target country and select your audience size.
Tip: With all lookalike audiences, the larger the source audience, the better quality the lookalike audience will be (since there are more data points to use). A general guideline for building lookalike audiences is that the source audience must have at least 1,000 people in it.
Conclusion
One of the advantages of using lookalike audiences is the ability to scale your campaigns quickly and easily. Because you create lookalike audiences based on a percentage sample of people in your target country (from 1% to 10%), you can start with a closely defined 1%, and as you reach higher ad frequency, introduce the 2% audience, and so on.
Compare this approach with interest-based targeting, which is more hit and miss when you have to create new audiences from different related interests.
What do you think? Do you use Facebook lookalike audiences for your Facebook ads? Please share your thoughts in the comments below.