In this video, you will learn about 13 apps that make passive income without any work or time put in. To make money from your smartphone, you don't have to take countless surveys, watch video trailers, download apps, etc. With these apps, you can do absolutely nothing after setting them up and just make residual income from then on. Enjoy the video!

Tuesday, 31 January 2017
13 Apps That Make Passive Income Without Any Work
In this video, you will learn about 13 apps that make passive income without any work or time put in. To make money from your smartphone, you don't have to take countless surveys, watch video trailers, download apps, etc. With these apps, you can do absolutely nothing after setting them up and just make residual income from then on. Enjoy the video!
Monday, 30 January 2017
10 Facebook Advertising Tips And Strategies 2016
10 Facebook advertising tips and strategies 2016. Learn how to build better audiences and get more likes, clicks, subscribers and customers.
In this video, you will learn how to get the most out of your Facebook ads. I'll cover how to build a targeted audience, split test different elements of your ads, how big your audience should be, what kind of interests you should target, etc. Get a better ROI with your Facebook advertising campaigns. Enjoy the video!
Sunday, 29 January 2017
How Quicksprout Gets So Much Targeted Internet Traffic
In this video, I will break down why Quicksprout is so successful. While many websites struggle to get traffic, leads and sales, Quicksprout thrives in a tough industry because of a few factors. One thing Neil Patel does really well with this site is use a simple, yet powerful web app on his homepage. This allows his site to keep the reader focused, help them, get their site info, get their email address and build backlinks. I will also go over the other techniques Quicksprout has used to become successful in the content marketing industry. Enjoy the video!
Saturday, 28 January 2017
How to Get Millions of Website Visitors Like Quicksprout
In this video, you will learn how to get millions of website visitors like Quicksprout (the popular marketing blog by Neil Patel) gets.
If you follow Neil Patel and his website, Quicksprout, you probably have noticed how many raving fans he has. This guy is one of the greatest content marketers online and he really knows how to get loads of readers for any blog he creates.
In fact, he did an experiment not too long ago where he built a blog from 0 to 100,000 visitors per month in a year, just to show it was possible. And, he succeeded. I'm going to break down what Neil Patel does on his website, Quicksprout, showing you 11 of the top strategies he uses to get millions of website visitors a year.
Friday, 27 January 2017
How To Make Money With Clickbank Without a Website - $200-$600 Daily!!!
how to make money with clickbank without a website
make money with clickbank without a website
making money with clickbank
clickbank tutorial for beginners
clickbank training
clickbank affiliate marketing
clickbank
Thursday, 26 January 2017
Clickbank Tutorial For Beginners Video 4 - Clickbank Guide
Clickbank Tutorial For Beginners
Clickbank For Beginners
clickbank guide
clickbank training
how to make money with clickbank
Wednesday, 25 January 2017
Clickbank Tutorial For Beginners Video 3 - Clickbank Guide
Clickbank Tutorial For Beginners
Clickbank For Beginners
clickbank guide
clickbank training
how to make money with clickbank
Tuesday, 24 January 2017
Clickbank Tutorial For Beginners Video 2 - Clickbank Guide
Clickbank Tutorial For Beginners
Clickbank For Beginners
clickbank guide
clickbank training
how to make money with clickbank
Monday, 23 January 2017
Clickbank Tutorial For Beginners Video 1 - Clickbank Guide
Clickbank Tutorial For Beginners
Clickbank For Beginners
clickbank guide
clickbank training
how to make money with clickbank
Sunday, 22 January 2017
How to Make an Automated Email “Feel” Personal (and Why You Should)

What are the 3 metrics that you look for in an email campaign’s report?
Well, if you’re anything like me (or like most other email marketers), you’ll immediately look for:
- your campaign’s open rate
- it's click through rate
- and the number of unsubscriptions
Now:
What if I were to tell you that there’s a tactic you can use to improve all these metrics… automagically?
You’d be interested, right?
Who wouldn’t be! So here it is—EMAIL PERSONALIZATION.
A research conducted by Experian showed that personalized subject lines drove a 26% higher overall unique open rates for companies across different niches.

I’ll first give you a primer on how email personalization works and the “tools” you’ll need, and then we’ll see some tactics you can use to make your automated emails feel personal.
Personalising automated emails
In personalised email marketing, you don’t bombard your list with the same email. Instead, you send your subscribers an email that’s personalised for them.Personalised emails use your subscriber’s details to tailor the email’s subject line and content.
Email personalization uses details like a subscriber’s:
- name
- demographics
- gender
- interests
- age
- date of joining the list
- interactions and engagement with the product (shopping or browsing history)
A quick note about “email personalization tools”
I’m sure when you hear the term “email personalization”, you wonder about all the DATA you’ll need and the different TOOLS that will get you this data.But there are no special email personalization tools—all you need is INTEGRATION between whatever customer management tool you use and your email marketing software.
Based on your personalization requirements, you can integrate your email marketing service with any of the following tools:
- CRM software (like Salesforce or HubSpot)
- eCommerce platform (for e.g., Shopify or BigCommerce)
- Accounting solution (like Quickbooks or Freshbooks)
How to start personalising your emails
As you saw in the first section, you can personalise your emails with such basic information as your subscribers’ names. You can also use information like their demographics, gender, date of joining and others.For a higher degree of personalization, you will have to use segmentation and data from your CRM tool.
Let’s now see some of the most effective email personalization techniques that you can start implementing today.
Personalise your email’s subject line
If you’re just starting with personalization, I’d recommend that you begin with personalising your subject line. All you need to personalise a subject line is your subscriber’s name – something you can collect right in your email signup form.When MarketingSherpa conducted A/B tests on 7 personalized subject lines, they found that the personalised subject lines got higher open rates. Each time. The higher open rates resulted in a 17.36% higher average click-through rates.
As you can see in the following screenshot – the only difference between the two versions is that of personalization using the subscriber’s first name:

I’m sure we’ve all, at some point, unsubscribed from a great list. What do you think prompts people to unsubscribe after opting-in for a list?
According to Epsilon, it’s irrelevant content. Epsilon reports that a whopping 64% of unsubscriptions happen because people find the email content irrelevant.
Luckily, email personalization can bring this down.
To personalise email content, you need to know about your subscribers’ interests. And you can learn these easily if you focus on building segments in your lists.
Here’s what I mean:
If you run a Games review site, don’t build a generic email list of “fans”.
Instead, build a segmented list with the segments having fans of the different games like, say, the Fallout 4 and Pokemon.
And when you post content about the Fallout 4 series, send an update email to just the Fallout segment. This way, your email content will look relevant to the subscribers of that segment (and they won’t unsubscribe).
(You will have to use your list building tool’s page/post level targeting features to build such segmented lists.)
Personalise your email’s offer using behavioural triggers
CRM tools or eCommerce platforms store data about a user’s interactions with the site. This information can be used to trigger emails with customised offers based on what the user recently showed interest in.Such emails are called trigger emails because they’re sent when users do a particular action. Trigger emails report a 152% higher open rate when compared to traditional emails.
For example, look at the following trigger email from Amazon:
(I got this email after I visited Amazon and looked up for some books on editing.)

Personalise your email copy using subscriber’s information
Again, personalising email copy can be as simple as using the subscriber’s first name to address them, or it could be as advanced as using dynamic content (like in the above example).The following screenshot shows a personalised email from Dropbox. Dropbox uses the subscriber’s company’s name to personalise their email copy:

Personalise your email’s “from field”
Personalising the sender’s field can make an email look more welcoming. So instead of sending your emails from your company’s (or blog’s) name, send them using your name.Just the way Neil Patel from QuickSprout does, his emails don’t come from the “QuickSprout Blog”. Instead, the sender’s field shows “Neil Patel”.

On a more advanced level, you can customise your email sender’s field with the name of the person from your company that a particular subscriber interacts with.
CampaignMonitor tells how Dubsat personalises their emails so that they appear to come from the account manager the client regularly deals with.

What are some of the most personalised emails you’re subscribed to? And what do you like the best about them? Do share in the comments!
Saturday, 21 January 2017
10 Laws of Social Media Marketing
Do you use social media to market your business?
There's bit of etiquette you should be familiar with.
Here are 10 points.
Thursday, 19 January 2017
8 Blogger Tools to Help Promote Your Content

Do you want more exposure for your blog?
Looking for tools to increase visibility for the content you publish?
In this article, you’ll discover eight tools to help you reach a wider audience with your blog content.
Discover eight tools to help promote your blog content.
If the goal is to drive traffic to your blog, why start with tools
that aren’t integrated with your blog? Because the great irony of
optimizing your on-page sharing first is that displaying low share
counts (in the single and double digits) will dramatically reduce the
number of people who engage with your blog content. High share counts, on the other hand, send your visitors the message that your content is worth sharing.
From a psychological standpoint, social proof (the tendency to do what other people are already doing) is perhaps the strongest form of persuasion. And the opposite, negative social proof, is equally strong.
Here are some tools that can help.
Online marketing is all about providing value. This means that on
social media, you can’t limit yourself to constantly promoting only your
own stuff. Instead, you also have to curate content, sharing other
people’s solutions and resources with your audience. Otherwise, you risk
coming off as only self-promotional.
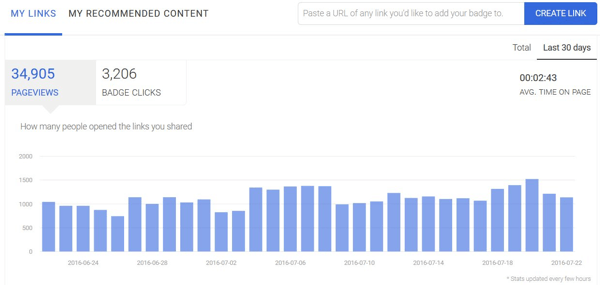
So how do you share other people’s content and at the same time call attention to your own? Enter Start A Fire. It’s a free application that allows you to subtly advertise your own links on the curated content you share from other people. Here’s what Start A Fire looks like when added to a post.
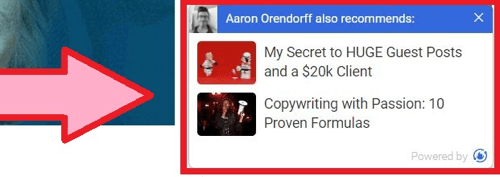
Start A Fire lets you add recommended content links to everything you share, even pages off-site.
Start A Fire integrates with social media management tools like
Buffer, HubSpot, Hootsuite, and Edgar. Once you “queue” something, a new
URL is created with “stfi” added. The resulting page is exactly the
same as the original with one addition: a small recommendation box at
the bottom of the page you’re sharing.
The more you share other people’s stuff, the more exposure you get. Sam Hurley, for instance, uses Start A Fire for everything he posts, and this one tool drives an impressive amount of traffic (i.e., badge clicks) back to his content.
Sam Hurley uses Start A Fire to generate over 3,000 clicks to his own content by
sharing other people’s content.
Quuu Promote
is a tool that lets you automatically share your quality content to a
much larger audience than you’d likely reach on your own. Note that
content can be rejected if it doesn’t meet Quuu Promote’s hand-curated
standards.
When you submit a URL, you can create a short-form version of your share for Twitter, a long-form version for Facebook, and add images. Quuu then lets you select the most relevant category for your post. The category you choose will determine the price of promotion, between $10 and $30 for 90 days.
I use Quuu Promote for nearly all of my articles, and the one below
has already outperformed the $50 I spent on a two-day Twitter ad that
generated only 45 clicks.
Posting your own content once to social media doesn’t mean your
promotional job is done. But resharing content can get overwhelming if
you’re responsible for multiple articles (whether as an individual or a
team).
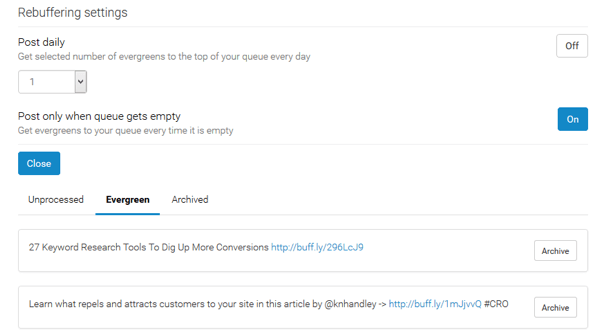
Hiplay pulls content you’ve already shared on social media from multiple accounts and lets you select evergreen posts you want to put into heavy rotation (from 1 to 10 times a day).
This means you can “set it and forget it” when it comes to content
you want to thoroughly expose to your audience, especially on Twitter,
where the lifespan of a tweet is roughly 18 minutes.
Similar to what Quuu Promote does for on-site content, CoPromote does for your social content. Pick a post you’ve already shared on Twitter, YouTube, or Tumblr and CoPromote will match it with users who are most likely to share your content with their followers.
With both free and paid options, CoPromote matches your social shares with
other users who have the same interests and passions.
As you share their content, they share yours.
CoPromote’s free option lets you boost one post at a time.
For more features, you can pay a monthly subscription fee that’s tied
directly to the number of followers you want your retweets exposed to.
On the free side, once you select the post to boost, you need to choose someone else’s post to share to earn points. The only problem is that the categories are a bit broad, and to preserve your own reputation, you’ll want to look through the posts of others to check what’s acceptable to promote or not. Naturally, the more you share, the more others will share your content.
Now let’s turn to the on-site basics. To increase your number of
shares, you have to make sharing easy and enticing. And that’s exactly
what these tools do.
SumoMe is the Swiss Army knife of on-site plugins. From welcome mats
to scroll boxes, contact forms to heat maps, SumoMe does it all. For
social media sharing, Share for SumoMe offers a responsive and unobtrusive floating share button panel that works across all website platforms.
SumoMe has essentially become the default social share plugin. Why?
The free version of SumoMe offers just about everything you need and
it’s easy to set up. Install the plugin, register your account (by clicking on the badge on your website’s dashboard), pick the tools you want, customize placement and display, and you’re off and running.
SumoMe is the Swiss Army knife of on-site plugins. It’s easy to set up and
the free version covers most of what you need.
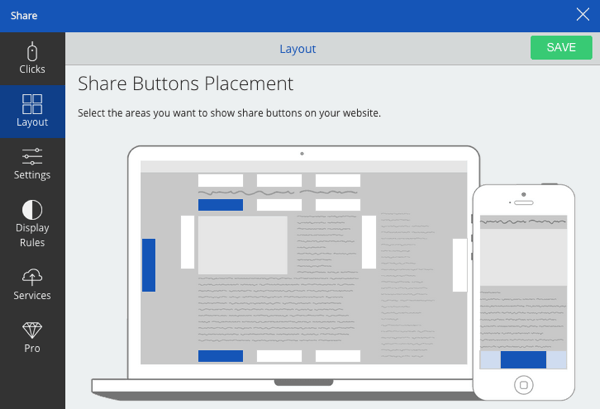
Monarch’s Social Sharing plugin is basically the designer version of SumoMe. You can choose from over 20 social networks for your visitors to share to.
Monarch offers sleek, aesthetically pleasing buttons and a wide variety of placement options. These include the usual suspects (like a floating sidebar, above content, or below content), as well as more custom approaches like inline sharing, widget options, and sharing within images and videos and via pop-ups.
Naturally, pop-ups are an effective way to increase engagement, but they’re also a bit irritating, especially when they appear immediately or multiple times throughout a visit. To give you more flexibility, Monarch allows you to trigger your social pop-ups based on six different on-page actions.
Lastly, when you purchase the plugin, you also get access to 87 WordPress Elegant themes and all of their other plugins.
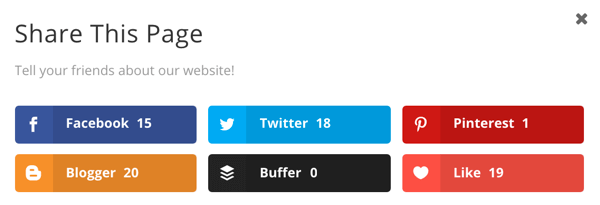
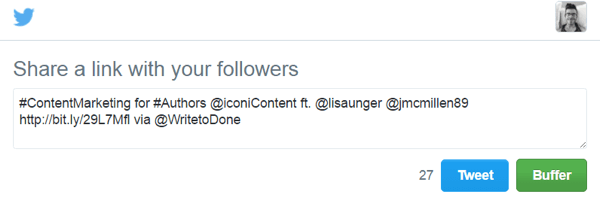
Social Warfare lives up to its name. It’s a full-on social media arsenal that lets you control and customize nearly every element of how your pages (in particular, your blog posts) appear on social media.
It’s a fact that social media posts with images get shared significantly more often. The problem is that images need to be different sizes and shapes for each platform. Social Warfare solves that problem by letting you upload images tailored to each network.
Likewise, hashtags and mentions also dramatically increase social
shares and engagement … but it’s hard to spoon-feed your audience
exactly what to include. Again, Social Warfare takes care of that for
you.
For instance, suppose you’ve written a guest blog post. You could create a default Twitter share that includes not only your handle and the site’s, but also the handles of experts featured in the piece, along with the two most relevant hashtags.
Click to Tweet,
as its name implies, generates one-click tweet boxes or links that can
be shared through any method: your website, your blog, or via email.
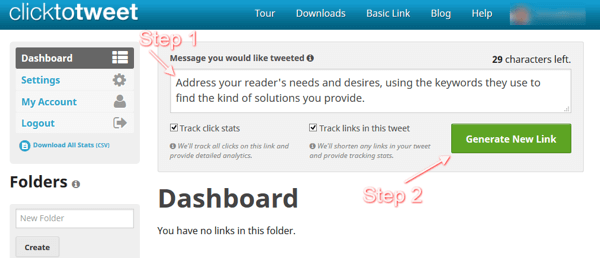
When people click on the text, the exact message you want to
highlight is created in their Twitter account, making it easy for them
to share article content beyond the usual headline along with a link.
Click to Tweet is a powerful way to add visual oomph and social media
savvy to quotes, stats, and key takeaways. You can even build entire
articles around Click to Tweet excerpts, like PR agency Onboardly did in
this article.
Tired of pouring your heart and soul into content only to have it hit social media and die? You’re not alone. A 2015 study from Moz and BuzzSumo concluded that 50% of the 100,000 randomly selected posts had two or fewer Twitter shares, two or fewer Facebook interactions, one or fewer Google+ shares, and zero LinkedIn shares.
The good news is these eight promotion tools can rescue your content from the social media graveyard and propel it to stardom.
Source
Looking for tools to increase visibility for the content you publish?
In this article, you’ll discover eight tools to help you reach a wider audience with your blog content.
Discover eight tools to help promote your blog content.
Step 1: Use External Tools to Promote Your Content
From a psychological standpoint, social proof (the tendency to do what other people are already doing) is perhaps the strongest form of persuasion. And the opposite, negative social proof, is equally strong.
Here are some tools that can help.
#1: Get More Value From Curated Content With Start A Fire
So how do you share other people’s content and at the same time call attention to your own? Enter Start A Fire. It’s a free application that allows you to subtly advertise your own links on the curated content you share from other people. Here’s what Start A Fire looks like when added to a post.
Start A Fire lets you add recommended content links to everything you share, even pages off-site.
The more you share other people’s stuff, the more exposure you get. Sam Hurley, for instance, uses Start A Fire for everything he posts, and this one tool drives an impressive amount of traffic (i.e., badge clicks) back to his content.
Sam Hurley uses Start A Fire to generate over 3,000 clicks to his own content by
sharing other people’s content.
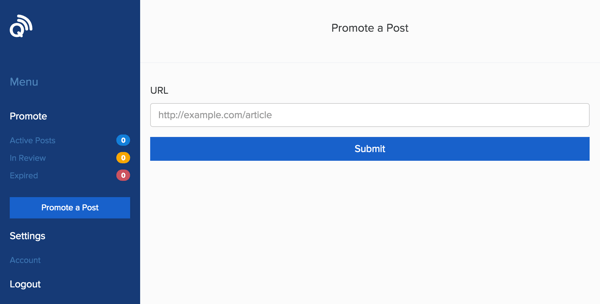
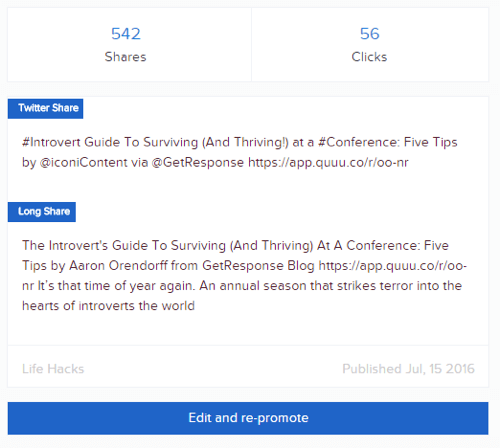
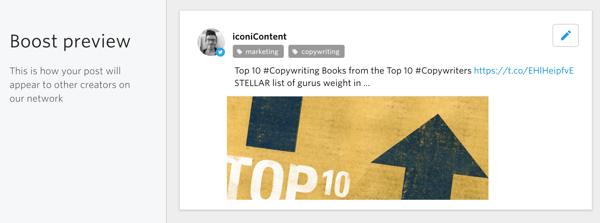
#2: Promote Content to a Targeted Audience With Quuu Promote
When you submit a URL, you can create a short-form version of your share for Twitter, a long-form version for Facebook, and add images. Quuu then lets you select the most relevant category for your post. The category you choose will determine the price of promotion, between $10 and $30 for 90 days.
Load
custom tweets and Facebook posts into Quuu Promote and get your
content shared automatically by their growing network of users.
content shared automatically by their growing network of users.
Quuu Promote shared this article 542 times through real Twitter users and generated 56 clicks, which is a 10.3% CTR.
#3: Reshare Select Social Media Posts With Hiplay
Hiplay pulls content you’ve already shared on social media from multiple accounts and lets you select evergreen posts you want to put into heavy rotation (from 1 to 10 times a day).
Want
to make sure your evergreen content is seen on social media?
Hiplay lets you put your favorite tweets into a daily rotation.
Hiplay lets you put your favorite tweets into a daily rotation.
#4: Team Up for Content Sharing With CoPromote
With both free and paid options, CoPromote matches your social shares with
other users who have the same interests and passions.
As you share their content, they share yours.
On the free side, once you select the post to boost, you need to choose someone else’s post to share to earn points. The only problem is that the categories are a bit broad, and to preserve your own reputation, you’ll want to look through the posts of others to check what’s acceptable to promote or not. Naturally, the more you share, the more others will share your content.
Step 2: Maximize Your On-page Shares
#5: Create Social Share Buttons With Share for SumoMe
SumoMe is the Swiss Army knife of on-site plugins. It’s easy to set up and
the free version covers most of what you need.
#6: Incorporate Multiple Social Sharing Methods With Monarch’s Social Sharing Plugin
Monarch offers sleek, aesthetically pleasing buttons and a wide variety of placement options. These include the usual suspects (like a floating sidebar, above content, or below content), as well as more custom approaches like inline sharing, widget options, and sharing within images and videos and via pop-ups.
Naturally, pop-ups are an effective way to increase engagement, but they’re also a bit irritating, especially when they appear immediately or multiple times throughout a visit. To give you more flexibility, Monarch allows you to trigger your social pop-ups based on six different on-page actions.
Monarch offers an automatic pop-up with multiple trigger options.
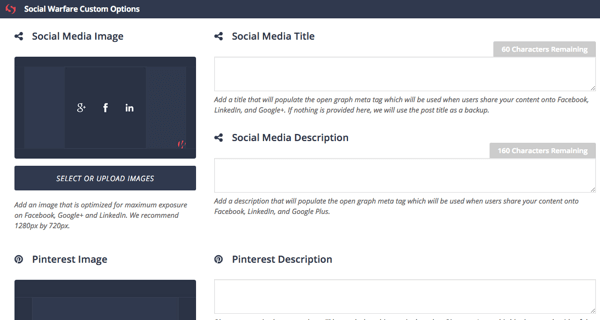
#7: Customize How Your Content Is Shared With Social Warfare
It’s a fact that social media posts with images get shared significantly more often. The problem is that images need to be different sizes and shapes for each platform. Social Warfare solves that problem by letting you upload images tailored to each network.
For instance, suppose you’ve written a guest blog post. You could create a default Twitter share that includes not only your handle and the site’s, but also the handles of experts featured in the piece, along with the two most relevant hashtags.
Social
Warfare preloads custom shares that include hashtags and specific
mentions,
both of which substantially increase engagement on social media.
both of which substantially increase engagement on social media.
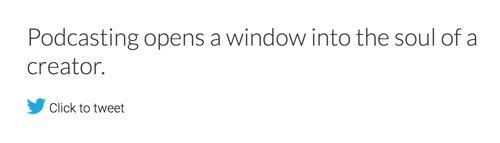
#8: Generate Click to Tweet Boxes
Highlight quotes, data, or takeaways with Click to Tweet.
Make it easy for your audience to share article content beyond the headline.
Share Your Content With Online Communities
This last tool isn’t really a tool, but it’s where all of my biggest social media wins start.
My go-to communities are Inbound.org and GrowthHackers. Both sites are online hubs where you can submit articles worthy of promotion and wider exposure. Once you submit, other members of the community can upvote and supply responses. Basically, they’re the online marketer’s version of Reddit, but a lot prettier.
Here are four tips to give you a head start in these types of communities:
Real human relationships are absolutely vital. You can’t just jump in with a bullhorn and start demanding promotional help. However, once you’ve developed relationships in the community, don’t submit your articles under your own name. Reach out and ask members you know to submit your articles for you.
Always add an image of some sort. Visually, a little goes a long way when the vast majority of submissions are just plain text. The image can be from the article’s header, but data-driven charts and graphs and memes work wonders too.
Include a description that goes beyond the default title and first paragraph. Including an original summary highlighting the piece’s value really increases its chances of becoming popular.
Engage in the comments. You could also tag additional members of the community to pull them in.
The truly powerful thing about sharing your content with online communities is that it doesn’t just drive interactions there; it leads directly back to getting more shares on the original pieces themselves.
ConclusionThis last tool isn’t really a tool, but it’s where all of my biggest social media wins start.
My go-to communities are Inbound.org and GrowthHackers. Both sites are online hubs where you can submit articles worthy of promotion and wider exposure. Once you submit, other members of the community can upvote and supply responses. Basically, they’re the online marketer’s version of Reddit, but a lot prettier.
Here are four tips to give you a head start in these types of communities:
Real human relationships are absolutely vital. You can’t just jump in with a bullhorn and start demanding promotional help. However, once you’ve developed relationships in the community, don’t submit your articles under your own name. Reach out and ask members you know to submit your articles for you.
Always add an image of some sort. Visually, a little goes a long way when the vast majority of submissions are just plain text. The image can be from the article’s header, but data-driven charts and graphs and memes work wonders too.
Include a description that goes beyond the default title and first paragraph. Including an original summary highlighting the piece’s value really increases its chances of becoming popular.
Engage in the comments. You could also tag additional members of the community to pull them in.
The truly powerful thing about sharing your content with online communities is that it doesn’t just drive interactions there; it leads directly back to getting more shares on the original pieces themselves.
Tired of pouring your heart and soul into content only to have it hit social media and die? You’re not alone. A 2015 study from Moz and BuzzSumo concluded that 50% of the 100,000 randomly selected posts had two or fewer Twitter shares, two or fewer Facebook interactions, one or fewer Google+ shares, and zero LinkedIn shares.
The good news is these eight promotion tools can rescue your content from the social media graveyard and propel it to stardom.
Source
Wednesday, 18 January 2017
[DOWNLOAD] Customer Avatar Worksheet: Finally, Get Clear on WHO You Are Selling To!
[DOWNLOAD] Customer Avatar Worksheet: Finally, Get Clear on WHO You Are Selling To!
Want to generate more leads and sales via Facebook ads? Copy & paste our 7 proven Facebook ad campaigns to create low-cost, high-converting campaigns today. Click here to download!
It makes sense, right?…
“To market a product or service properly, the first thing you must do is get clear on WHO your ideal customer is, where they are hanging out, what their challenges are…”
You know building a customer avatar (some call it a buyer persona) would have a huge impact on your marketing.
But how?
We’ll get into the how-to in just a second, first understand that a customer avatar is…
The Swiss Army Knife of Marketing
This exercise will impact virtually every aspect of your marketing and sales process including…
- Content Marketing – What blog posts, videos, podcasts, Lead Magnets, etc. should you create to attract and convert your avatar?
- Paid Traffic – Which ad platforms should you buy traffic from and what targeting options should you use?
- Product Creation – What solutions is your avatar searching for?
- Copywriting – How should you describe offers in your email marketing, ads and sales letters in a way that compels your avatar to buy?
- Email Marketing – Which avatar should receive a specific email marketing campaign?
… and that’s just scratching the surface. Any part of the marketing
and sales process that “touches” the customer (which is pretty much
EVERYTHING) will improve when you get clear on your customer avatar.
After all, it’s a person that buys our products and services. It pays
to get clear on the characteristics of that person, so you can find and present them with a message that moves them to action.
Let’s look at an example customer avatar…
Customer Avatar Example: Meet Agency Eric
In April of 2015, DigitalMarketer introduced a new offer.
We began selling a new type of digital marketing training product: Certification Classes. These new trainings include exams, certificates and badges.
A new product means a new ideal customer. And, a new ideal customer means a new customer avatar must be built.
We defined 4 distinct buyer personas:
- The Marketing Freelancer – interested in training and certification to distinguish herself from the other freelancers she is competing within the marketplace.
- The Marketing Agency Owner – interested in training and certification to add to the services he can offer his clients and to sharpen the marketing skills of his employees.
- The Employee – interested in training and certifications to distinguish himself at his place of employement or to secure a new job or promotion within his existing job.
- The Business Owner – interested in training and certifications to sharpen her own marketing skills and the skills of her internal marketing team members.
As a result, four new “Customer Avatars” were born.
One of these avatars is known as Agency Eric:
Let’s have a look at the different components of the Agency Eric customer avatar as an example.
Customer Avatars: What To Include
There are 5 major components to the customer avatar. In some cases,
you’ll need to survey or have conversations with existing customers to
accurately flesh out your customer avatar.
In other cases, you’ll be intimately familiar with the characteristics of your ideal customer.
In any case, move forward. Don’t wait for surveys or interviews to be conducted to create your first draft of an avatar. Make assumptions where you have no data or feedback and put it on your short list of to-do’s to complete your research.
In the meantime, you’ll begin getting benefit from an avatar built from the assumptions you’ve made.
Let’s look at each section of the Customer Avatar Worksheet in turn…
Goals and Values
We begin with the goals and values of your ideal customer.
Make note of the goals and values that are relevant to the products
and services you offer. You’ll use this information to drive…
- Product creation
- Copywriting
- Content marketing
- Email marketing
We know, for example, that Agency Eric is interested in “increasing the capabilities of his team.”
As a result, we could draft an email to this avatar that promotes our Content Marketing certification with the subject line:
Need Content Marketing training?
That should get Agency Eric’s attention.
Sources of Information
This section of the Customer Avatar Worksheet is critical to determining the “where” of your customer avatar.
You will determine the best places to advertise and the targeting options you’ll use to reach your avatar by listing their sources of information.
Use the “But no one else would” trick when filling out this section
of the worksheet. You’ll simply complete sentences like these…
- My ideal customer would read [BOOK], but no one else would.
- My ideal customer would subscribe to [MAGAZINE], but no one else would.
- My ideal customer would attend [CONFERENCE], but no one else would.
Are you getting the picture?
The idea is to find the niche books, magazines, blogs, conferences,
gurus, etc. your ideal customer would be attracted to – but no one else
would.
For example, if you are in the golf products market – you wouldn’t
want to assign Tiger Woods as a guru. Tiger is someone that golfers are
familiar with… but so is everyone else.
Instead, choosing a more niche golfer like Rory McElroy will allow
you to hone in on your ideal customer – and exclude everyone else.
When buying traffic from ad platforms like Facebook, you’ll often be able to laser target your audience by focusing on these niche interests — while excluding less than ideal prospects.
Demographic Information
Applying demographic information will bring your customer avatar to life.
While the usual demographics are critical, the exercise of filling in
the ‘Quote’ field can be particularly helpful to “get inside the head”
of your ideal customer.
The demographics are another useful part of the Customer Avatar when choosing targeting options in ad platforms like Facebook.
And, when writing content, email or sales copy it can be beneficial
to simply write as though your avatar were sitting across the table from
you. Demographic information like age, gender and location will give your persona a look and feel.
Challenges and Pain Points
This section will drive new product/service development as well as the copywriting and ad creative you’ll use to compel your ideal customer to action.
When selling certifications to Agency Eric, for example, we would do
well to build solutions to his challenges and pain points and use
language that addresses them in our marketing messages. For example, our
sales letter should include copy like…
Are you tired of losing proposals simply because you don’t offer Content Marketing services to your clients? Certify your team with Digital Marketer’s Content Marketing Mastery Course and Certification.
Copy like that will get a response from Agency Eric because it is specific to one of his pain points.
Objections and Role In Purchase Process
Why would your customer avatar choose NOT to buy your product or
service? These are called “objections” and they must be addressed in
your marketing.
For example, if we know that Agency Eric is concerned with the amount
of time his team members will be “out of pocket” to receive the
certification, we might send an email with a subject line like…
Content Marketing Certified (In one business day)
You must also determine your avatar’s role in the purchasing process.
Are they the primary decision maker? Are they a decision influencer?
Understanding your ideal customers decision making process is paramount to the success of your marketing and sales campaigns.
Build Multiple Avatars
Start by building a single avatar. But don’t stop there.
Once you get the hang of it, you’ll be churning out multiple avatars representing the different segments of your market.
Don’t go overboard, but any lucrative market segment with a distinct
set of goals, sources of information, pain points, etc. is deserving of a
customer avatar.
Use the Customer Avatar Worksheets below (there are male and female versions) to get clear on your ideal customer.
Source
Tuesday, 17 January 2017
AMAZON AFFILIATE MARKETING Website with WordPress, Woocommerce & Woozone 2016
Check out the site you'll be making: http://shop-power-tools.com/ - Amazon Success stories from this video: https://youtu.be/1mcHNxyd62c
In this video I take you through creating your very own Amazon Affiliate/Associate website powered by WordPress and Woocommerce. It's a great way to get started in Amazon affiliate marketing. I'll take you through the whole process from start to finish including setting up hosting, installing Wordpress, configuring your theme and plugins and importing products from Amazon.
Thinks you'll need for this video:
Find an expired domain (optional): https://www.expireddomains.net/
Check how good the expired domain is with: https://majestic.com/ & https://moz.com/researchtools/ose/
Get your hosting: http://www.wpeagle.com/hostgator/ - Use code "EAGLEPENNY" to get your first month for $0.01 !
Get the theme: http://www.wpeagle.com/flatsome/
Get the plugin: http://www.wpeagle.com/woozone/
Get photos: http://www.wpeagle.com/photodune/
Chapters:
Setting up hosting 4:42
Repointing a domain you’ve registered before: 8:00
Logging into your hosting control panel: 9:32
Installing WordPress 10:10
Changing your WordPress password: 11:39
Installing the Flatsome Theme 12:27
Installing the Woozone Amazon Affiliate plugin: 15:41
Configuring the Woozone Amazon Affiliate plugin: 17:33
Importing your products from Amazon: 26:17
Increasing your server PHP memory limit: 30:35
Resizing the product images: 36:45
Adding your logo: 41:01
Customising the colours on your site: 42:23
Importing the demo content: 45:24
Setting up the homepage: 48:07
Tidying up the demo products: 49:33
Getting some images for your homepage: 51:15
Setting up your homepage banners: 51:51
Adding the featured product area to the homepage: 59:05
Removing the best seller element on the homepage and adding recent products: 1:00:59
Adding the 3 text boxes with icons to the homepage: 1:02:52
Setting the product category images: 1:10:22
Tidying the navigation menu: 01:12:22
Tidying up and Editing the static pages like the about us page: 1:16:10
Setting up the top bar & adding social media icons 1:20:42
Creating and adding the top navigation menu: 1:23:42
Setting the my account menu: 1:24:42
Adding Widgets to the footer: 1:25:16
Adding a navigation menu to the footer: 1:27:08
Editing the contact page and adding the form: 1:30:35
Setting up Google Analytics: 1:33:35
Install Yoast SEO: 1:36:13
Setting page titles for SEO: 1:37:00
Submitting a sitemap to Google: 1:39:08
Turning off the coming soon page: 1:41:46
Adding the shop sidebars: 1:43:00
Monday, 16 January 2017
AFFILIATE MARKETING WEBSITE TUTORIAL for Beginners
In this video I take you through setting up an affiliate marketing website using WordPress. This tutorial is designed for Beginners so even if you've got no experience in affiliate marketing or making WordPress websites, don't worry, you'll be fine.
Affiliate marketing is when you sign up with an online merchant, or shop as an affiliate and send traffic from your website or social media using special tracking links. When someone makes a purchase from them after clicking one of your links (or in some cases using your voucher code) you get a commission.
A great way to get into Affiliate marketing is setup a review site. With a review site you post honest reviews about products and services along with your affiliate links so people can easily make a purchase. The great thing about a review site is that catches shoppers just before they are about to buy, which in turn can give you a high conversion rate.. :)
In this video we go through everything from setting up the website hosting, through to setting up WordPress and posting some reviews. You can post reviews on anything you like, the WordPress themes are just an example. You can also change all the colours & logo etc allowing you to create an affiliate marketing site that matches your products.
BOOKMARKS
Introduction to Affiliate Marketing and this video: 1:18
Setting up our website Hosting: 9:07
Repointing a domain you’ve already registered: 15:33
Installing WordPress: 18:17
Logging into to WordPress: 19:44
Downloading and installing our Affiliate Website Theme: 21:05
Installing the demo content to get us started on our Affiliate Marketing Website: 25:05
Customising our Affiliate website logo and top area: 27:14
Adjusting colours and fonts: 30:45
Working with review categories: 32:15
Adjusting the text on the homepage: 35:57
Editing and Adding the Affiliate reviews: 37:08
Adding your Affiliate links to reviews: 55:03
Adding the duplicate post plugin to easily copy your content: 01:03:06
Adding banners to the homepage 01:05:37
Working with blog post: 01:13:11
Configuring the widgets in the footer and sidebars: 01:21:23
Final Tweaks and settings including changing the the text in the header: 01:25:32
Customising the menu across the top of the website: 01:28:24
Adjusting the menu font size: 01:30:24
Working with WordPress pages: 01:30:55
Making the Affiliate Marketing Website live: 1:33:00
Subscribe to:
Posts (Atom)