With 2.2 billion active users, it might seem like turning followers into paying customers on Facebook would be easy. At least a few of those users will want what you’re selling ... right? Unfortunately, targeting a local market on Facebook is a little more challenging than that. Building a local Facebook marketing strategy is challenging, but extremely rewarding when executed correctly. Here are nine proven Facebook marketing tactics you can use to drive foot traffic, build brand awareness, and increase revenue potential.
9 Tactics for Your Local Facebook Marketing Strategy
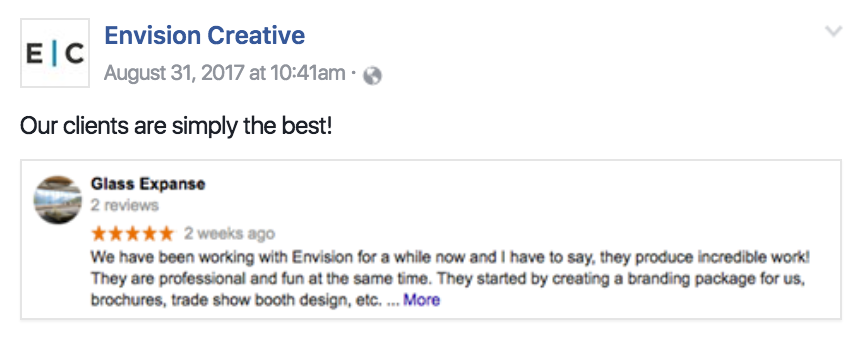
1. Share Reviews
Standing out can be difficult when you’re surrounded by hundreds of other businesses all vying for attention. The key often lies in using social proof. People trust businesses that can prove what they say is true -- especially if that proof comes from a customer. Here are two review tactics we use:
Share screenshots of positive reviews from other social sites.
Ask customers to share the experience they’ve had with your business.
Screenshot positive reviews on sites like Yelp and Google+, and then share them on your Facebook page. Tag the reviewer’s business in your post with a sincere “Thank you,”, or just happily boast that you have the best customers. Sharing screenshots of emails from happy customers works too, just be sure you ask permission first.
If you’re just starting out and your business doesn’t have any reviews yet, give your audience an incentive to leave positive feedback. Ask your followers how their last experience was at your business. Offer a product giveaway to the first five people that leave a comment describing why they love your company. Even if you don’t get an official Facebook review, someone will probably comment on their experience. That’s social proof.
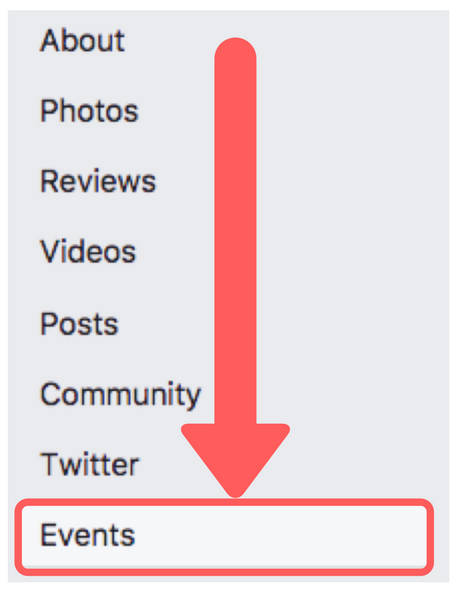
2. Create an Event
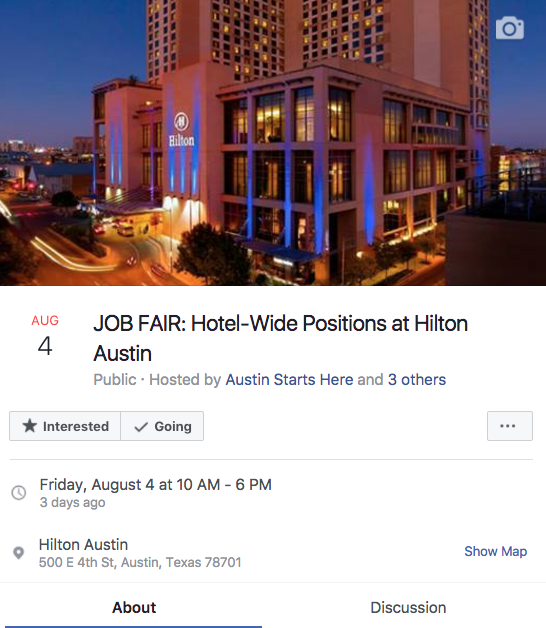
Having a live band perform at your restaurant this weekend or throwing a big sale at your retail store? Facebook events are a great way to notify your followers and generate some buzz for your business. Even if people can't attend in person, it shows that your business is actively engaged with the community. Creating an event on your Facebook page is easy. First, navigate to the “Events” tab.
Select the blue “Create Event” button.
Fill in the details:
Date and time
Event category
Event keywords
A link to the ticketing website
Finally, add a compelling photo, and you’re good to go.
A few tips to improve the reach of your Facebook event:
Add directions or a map to make it easy for people to find your event.
Invite up to 500 people.
Share your event and/or promote it as an ad.
3. Use Groups
Groups offer a wide variety of local Facebook marketing advantages. Some of the best include:
Listing and selling products
Building a community
Establishing expertise
Networking
Offering great customer service
The possibilities for creating and managing a group on Facebook are only limited by your imagination. Groups are the perfect place to create a controlled community within your target audience. As the admin of the group, you can approve or reject all posts, accept or block members, and direct the commentary. Groups allow you to build a micro-community that is hyper-focused on the subject of your choosing. For example, a business that sells laptop cases could create an entire Facebook group centered around laptop cases and their various uses, the best kinds, how to determine product quality, and humorous customer stories.
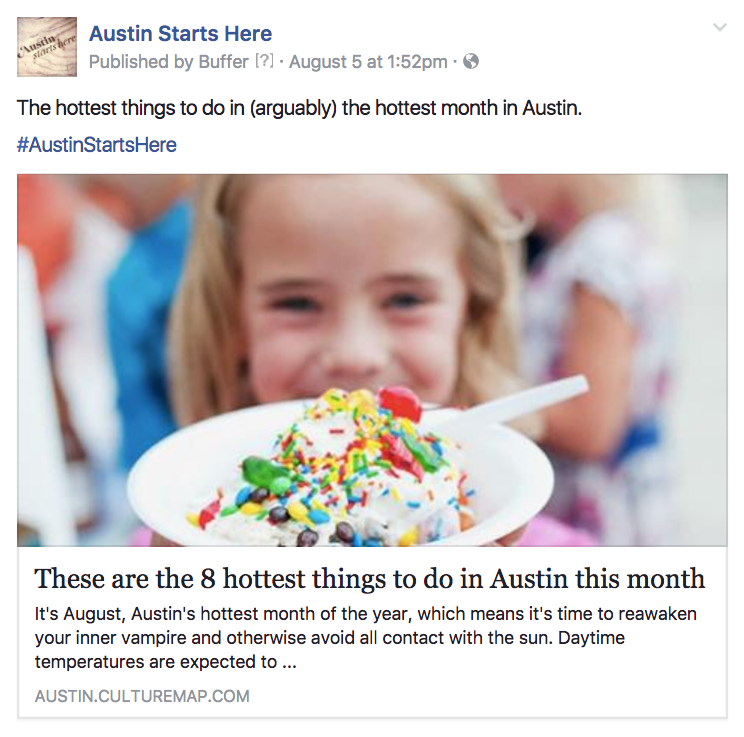
4. Share Local Content
One thing that’s consistent across Facebook is that people love to celebrate local pride. Align your business with famous events, history, people, landmarks, sayings, and other nuances that are part of your city’s identity. Share content from local organizations that captures the essence of your locale and will interest to your audience.
These are examples of good local content topics:
13 Things Keeping Austin Weird
How Boston’s “R”-less Accent Became So Famous
The Best Festivals to Attend this Summer in San Diego
Make your Facebook page an extension of the culture and traditions surrounding your location.
5. Mention Local Businesses, Events, and Groups
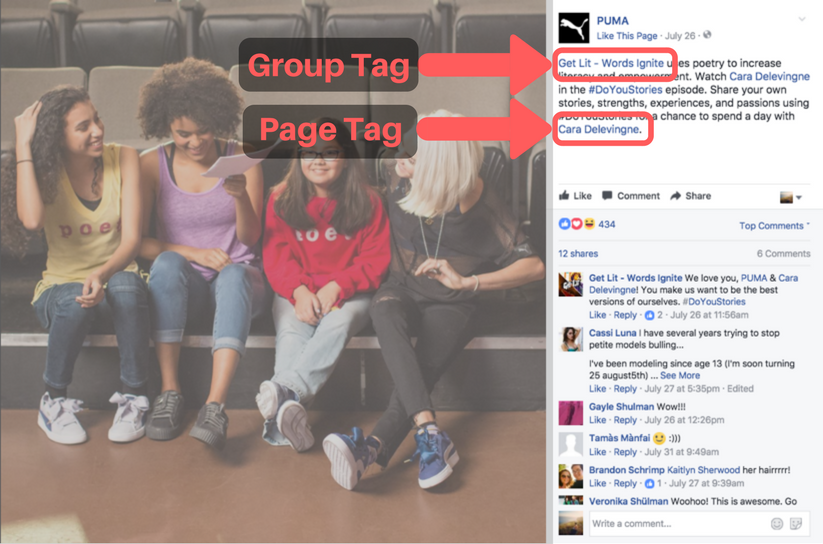
If you’re looking for ways to build engagement and gain traction, tag accounts that share content which aligns with your audience’s interests. As with all things on social media, tagging can be overdone, so don’t start tagging pages in every post. Rather, choose the ones that will have the greatest impact and provide value to your audience. Tagging is another great way to support local marketing efforts. Build hype for an event your company is hosting using a Facebook live video, or showcase company culture with a group photo at the next conference you attend. One word of caution: if you decide to try Facebook live, write a script. The last thing you want to do is live-stream without a plan. In addition to page tags, groups can also be tagged. This is especially effective when you’re attending industry events or working on collaborations. Athletic wear brands, such as Puma, do an exceptional job promoting their collaborations on Facebook.
6. Tag Locations & Events
I’m not talking about tagging your latest check-in at Olive Garden, I’m talking about event marketing, company outings, and business development trips. Manning a booth at Comic-Con? Post a group picture that tags the event and location. Taking the team out for someone’s Birthday lunch? Tag the location and upload a boomerang. Checking out your latest digital billboard downtown? Tag the location and upload a picture. Add some variety to your Facebook page by tagging locations and show off your company’s personality at the same time.
7. Run a Contest
Everybody likes to win things. There are many different ways to run a Facebook contest. The two most popular include hosting a promotion on a Facebook app or on your Page’s Timeline. Pay close attention to Facebook’s content rules because disregarding them could get your contest shutdown. Here are just a few things you can’t do:
You can’t require participants to share a page or post on your Timeline to enter
You can’t require participants to like a page to enter
You can’t require participants to tag themselves in pictures to enter
The list goes on. Review a thorough breakdown of what you can and can’t do when running a Facebook contest here. Helpful hint: even though you can’t require page likes, photo tagging, and timeline posting, you can still encourage the audience to complete those actions.
8. Encourage Foot Traffic
Retail companies often struggle to make Facebook work in their favor. The biggest problem is getting people online to come into the store. Here are a few tips to start turning Facebook followers into foot traffic that have revenue potential:
Create polls and contests centered on popular products and their uses
Run regular in-store events your customers are interested in
Promote in-store coupons, giveaways, and sweepstakes
Build a shop directly on Facebook where your customers can purchase your products
Align your page with causes your audience cares about
Think of Facebook as your marketing email and your store as the landing page. In order to get people from the digital universe to visit your physical business, you need to have a compelling message and offer they can’t refuse. For example, if there’s a large sales conference in town you could create a set of Facebook ads that are focused on the area surrounding the conference center and targets sales professionals over the age of 21. Offer a lunch discount and provide all the details they need to make a quick meal grab before heading to their next session.
9. On-Site Promotion of Your Facebook Page
Try to convert the foot traffic your business attracts into online brand advocates. Use signage, receipts, business cards, flyers, coupons and more to ask for page likes, check-ins, reviews, and posts on your Facebook Timeline. Here are a few ideas to get you started:
Give away a $200 gift card that requires participants to post a picture taken in front of a branded mural, sign, or display that tags your Facebook page.
Offer a 20% off discount for everyone who checks-in at your store on a Wednesday.
Executing successful Facebook local marketing tactics requires consistent testing and experimentation. What works for a retail business might not work for a restaurant, and vice versa. Take the time to figure out what your audience responds to the best and what generates the most business for your company through Facebook. Successful Facebook local marketing can take time. Be patient, detail oriented and persistent.
When it comes to your email marketing, you already have a lot working against you in a subscriber’s inbox. Family news, party invites, and every other online business owner vying for some attention are your competition, and you’ve got to find a way to rise above the chatter. The best way to do that? Email segmentation.
The name itself might not initially sound like a strategy for increased open and click rates, but once I start to unpack it a little more, you’ll quickly see why email segmentation is going to be your new best friend. In fact, according to DMA, 77% of email marketing ROI came from segmented, targeted, and triggered campaigns in 2015. So I’m not just talking about deliverability anymore – I’m talking about product sales and money in your pocket.
Stated simply, email segmentation is the process of putting your email subscribers into different buckets and speaking to each of those groups directly. Think of it as meeting your subscribers where they’re at on their customer journey so you can send them targeted content that speaks specifically to their needs and goals at that point in time. To do that, you’re going to need to do some recon on your subscribers, but we’ll talk about that later. First let me tell you a bit more about the benefits of email segmentation.
Why you need email segmenting in your email marketing
Email segmentation is one of the key distinctions between a list that converts and one that makes it hard to reach your goals. Knowing your subscriber's backstory and how they interact with your content is key to understanding how to communicate with them and pitch your products.
For example, if you know that your subscriber is a newbie on your topic, you can specifically send them your intro level eBooks for free and put them into a sequence where you teach them the basics of your topic to gain their trust and build authority.
But if you find that another of your subscribers is more knowledgeable on your topic, you can send them one of your more complex eBooks and put them into a sequence that eventually pitches them one of your more expensive and advanced products. See how that works?
Now you know that email segmentation helps you meet your subscribers where they’re at, but here’s what segmentation actually means for your email deliverability:
Increased Open Rates
An email in an inbox is only as good as the person reading it. Having a segmented list allows you to send the same email but with custom subject lines to specific subscriber groups that appeal to their needs.
Your customers aren’t all the same person and segmentation can help you get more specific with smaller groups of your list.
Better Click-Through Rates
Once you have those custom subject lines set up for your different subscriber groups and you’ve sent your emails off, it’s up to your subscribers for the next step– click-throughs.
Setting up targeted emails alone won’t put money in the bank. You need your email subscribers to interact with your content by clicking through on links to your articles, videos, and, ultimately, your products.
ConvertKit customers with targeted segmentation often see click-through rates of as high as 10-14%. Considering the industry average across all email marketing platforms is roughly 6%, that’s at least a 66% increase. Your subscribers are also much happier as they’re now getting emails they actually want to open and click on. It’s definitely a win-win.
Maximized Conversions
When you’ve reached that trust point and are ready to send your sales email to your list, the last thing you want to see is zero conversions. If you’re emailing your entire list of subscribers who may or may not be interested in that particular offering, you risk losing them as a subscriber and you certainly risk losing the sale. You’ve got to narrow your audience based on your subject.
With good segmentation you can track who clicks on your links and then send targeted emails just to those people with a reminder about any details, some FAQs, or anything else they need to know to seal the deal. Emailing just the people who have shown direct interest is not just a smart business move, it makes you look like a real human on the other side of the computer screen too.
Using segmentation to your advantage will keep the number of unsubscribes to your account at a minimum. You’ll still have people who clean up their inboxes for time to time, but the more targeted you can get with the emails you send, the more likely your subscribers are to hang out.
Avoid The Dreaded SPAM Filter
The whole point of email marketing is to have the emails you send actually delivered and read, right? Spam folders are notorious for making that hard on marketers, but there are actions you can take to make it better.
Email service providers (ESPs) want to see that your subscribers are opening emails, clicking on links, sharing emails, replying to emails, marking them as important, and not immediately hitting delete. Sending targeted email content through segmentation helps you avoid being flagged by those ESPs.
Want to know more about how to increase the quality of your list and avoid the SPAM filter? Read up right here.
Hopefully now you see that email segmentation is the best way to create targeted content for your email subscribers to help with your click rates, revenue, and so much more. Now let me tell you how easy it is to create segmentation in ConvertKit.
How to segment email subscribers with tags in ConvertKit
In ConvertKit, we create segmentation by tagging subscribers and then grouping those tags together. So basically tags organize people and segments organize tags.
Tags allow you to organize and group your subscribers based on actions, interest, and more. Because we are subscriber-centric and not list-centric, you only have one list of subscribers, and tags help you keep that one list organized.
Ways you can add tags to your customers are:
With Link Triggers, you can add a tag when a subscriber clicks a link.
With certain integrations, you can add a tag based on a purchase.
You can import into a tag, so you know when you brought over certain subscribers
Within the ConvertKit app:
Tags can be created on the Subscriber page or within an Automation.
Tags can be added to existing subscribers on the Subscriber page via Bulk Actions, or within an individual Subscriber profile.
Here's a quick video that explains how to use forms, tags and segments effectively.
Figuring out the best way to segment your email marketing lists can be a huge undertaking. But the more you tag, the better you can target your emails with content that feels tailor made for each subscriber.
Types of subscriber data to collect for email segmentation
You could also think of tags in terms of data you collect about your subscribers. This data will help you get to know your subscribers better– what they’re interested in, where they’re from, what they want to learn from you– so that you can send them more targeted content and in turn pitch them products they actually want. Here are some tags that we suggest our customers use for collecting data for their subscribers:
Where the subscriber is at on their customer journey
Other than the basic information, this is one of the first pieces of data email marketers use to start segmenting their list. Knowing this initial starting point will help you know what level of skill, knowledge, and engagement your subscriber has with your topic. This can give you insight on everything from what kind of product to pitch to how much teaching content you need to prepare.
How to use this tag– In your introductory email, ask your subscribers what their main struggle is by offering five different options to choose from. The reader will respond by clicking on the link they identify with which will trigger a sequence that ends by pitching a product geared toward that struggle.
Products they’ve bought/downloaded from you
The next thing you'll want to track is when subscribers purchase your product. It helps to create a tag called “Purchase: Product Name” for each product. Then Gumroad, Shopify, Teachable, or whatever other e-commerce provider you are using can add customers to that tag once they make a purchase through an automation. And don't forget to include these purchase tags in your newsletter or all subscribers segments
How to use this tag– Knowing what a subscriber has already purchased helps you in a couple different ways.
You can exclude that person (through their tag of Purchase: Product Name) from any further communication about that product. They don’t need your sequences that pitch that product any more since they’ve already bought it, right?
You can make an assumption on what other products they might enjoy based on their first purchase. You can set up a link trigger that sets them into a new sequence that pitches your subscriber that similar product.
Webinar attendee
People who join webinars are generally people who are excited to learn. A webinar attendee has already given you their email address so they could attend your webinar, so make sure to make the most of this list growth by adding a webinar tag to their name.
How to use this tag- You’ve most likely given away a free product or pitched something on a webinar, so you know that anyone with that tag already has a basic knowledge of who you are and what you do. You can parlay that knowledge by putting people with that tag through a sequence that teaches them more in depth on your webinar topic and ends with a hard pitch for one of your products for sale.
Event attendee
Don't miss the opportunity to reach out to leads and potential customers you've already made a positive connection with at a live event.
How to use this tag- Segment your email list depending on the type, topic, or theme of event or even to RSVPs who didn't make it out. You'll be able to keep inviting them to events while sharing relevant content offers based on what you learned about them from past events.
Where the subscriber’s sign up form came from
Did your new subscriber sign up because of your podcast or video show? Did they read your guest blog post you wrote or find you through a contest you contributed a product to? Knowing the type of content your subscriber originally found you on can tell you a lot about what kind of content they like and how they like to consume it.
How to use this tag- If a subscriber found you through your podcast, you know that you can push any products you have related to creating and hosting podcasts. If a subscriber found you through a guest post, you can create content and products that relate to the core topic of the blog that hosted your guest post (or at least reach out to more blogs in that industry to expand your audience).
If they refer your products/services often
If you have customers who constantly refer you to new clients or other businesses, it’s a good idea to create a tag for them. These customers are your biggest advocates and you should give them extras from time to time.
How to use this tag- You can use these advocates as beta-testers when you have a new product coming out. And to give them extra incentive to keep referring you, you could send them extras like discounts, free trials, or even set up some kind of affiliate system.
What affiliate the subscriber came from
If you already have an affiliate program setup, it’s smart to keep the sign ups for each affiliate separate. Every affiliate will cover their own niche topic so knowing which affiliate a new subscriber comes from helps you craft content specifically for them.
How to use this tag- If you blog about baking cakes and you have an affiliate that blogs about wedding inspiration, you could create an eBook or another small free giveaway about popular wedding cake flavor combinations or color schemes that you can send to subscribers who came specifically from that affiliate.
Interests
If you blog on different topics, it’s very important to keep all your readers grouped into their correct interest so you’re not talking to them about the stuff they don’t need.
How to use this tag-You could run a survey asking your readers to click one of five topics you blog about. The link they click will tag them by their favorite interest, and now you know more specifically who to send content to when you deal with multiple topics.
Interested in, but hasn’t bought
A subscriber can go through a whole teaching sequence of yours and still not end up purchasing anything. You can create a link in the final email of that sequence that tags those subscribers as “interest in: product name”
How to use this tag- When that subscriber goes through your sequences and ends up not purchasing and being tagged as “interested”, you can send them a follow up sequence with a downsell of that product they are interested in. It could be a smaller version at a lower price or just a lower priced product that you think compliments the original product you were pitching. Doing this shows that subscriber that you care about them getting a product that truly helps them reach their goals and can go a long way in building trust and authority.
Customer tag
Whenever a subscriber buys anything from you, give them a ‘customer’ tag. Knowing what subscribers have made a purchase from you lets you know that they might be willing to buy other products from you. The difference between the “interested in” tag and the “customer” tag here is big. It’s the difference between sending a subscriber through another teaching sequence and offering free incentives or sending them through a sequence with a hard pitch that doesn’t involve as much trust building.
How to use this tag- If a subscriber purchases your course on “How to use gluten-free flours in baking”, you can assume that since they bought a course on this subject from you, they might also purchase another course from you in a similar topic. You could send them into a sequence with a hard pitch on your more targeted course “Gluten-free bread baking”.
Time to get tagging
It’s a Type A’s dream, right? Gathering all the information and putting your subscribers in their designated places will not only help you understand your audience more, it’s also going to help your audience feel understood. The more you send them content that feels like you wrote it just for them, the more they’ll trust you and your work– that means increased revenue numbers.
Do these data points we talked about work for your audience? What other tags would add to this list? Let’s talk about it in the comments.
Jadah Sellner and Jen Hansard, two moms who co-founded a business called
Simple Green Smoothies, added 28,000 people to their email list in
2013. These days, they have an active, engaged list of more than 385,000
people.
My first reaction when I heard those numbers was, “WOW.”
Want to know what propelled their accelerated list growth?
Four times a year, Jadah and Jen host 30-Day Green Smoothie Challenges.
People who are interested sign up for the challenge and pledge to drink
one green smoothie every day for 30 days. During the challenge, Jadah
and Jen send weekly emails that include inspiration, shopping lists,
recipes, and smoothie tips.
Challenges are a popular way to attract email subscribers and get people
to spread the word about your business. They’re also a lot of fun for
your community members.
Let’s take a look at how challenges work and how to design a challenge that will help you reach your business goals.
What is a challenge, and how will it help your business?
When you host a challenge for your audience, you select and promote an
action you’d like your community members to take. It’s usually a
short-term commitment.
To join your challenge and play along, your community members register
for it either by signing up for your email list or joining a group on a
social media site. Then you give the participants support,
encouragement, and tips during the challenge itself.
Challenges are often free, but you can potentially charge for them as part of a larger program or online course.
Throughout the challenge, participants focus on one goal — whether that
goal is eating healthier food, daily meditation, or writing a novel.
Challenges draw attention to your business. People get excited about
challenges and share them on social media, so their friends and family
can see what they’re up to (and play along). Dedicated community members
will come back to participate in every challenge.
Let’s take a look at three successful free challenges.
Example #1: National Novel Writing Month
One of the very first virtual challenges that came on my radar was National Novel Writing Month. The annual NaNoWriMo challenge encourages participants to write an entire novel (50,000 words) during the month of November.
Writers sign up to receive inspiring and instructional emails during the
challenge and get access to the community forums, where they can buddy
up to get additional writing support.
The program started in 1999 and today NaNoWriMo is an official 501(c)(3)
organization. More than 400,000 people participated in the
fiction-writing challenge in 2015.
Example #2: The EFT Tapping challenge
Emotional Freedom Techniques (EFT) is a form of acupressure — similar to
acupuncture — during which you tap on energy meridians with your
fingertips to treat emotional or physical issues.
Claire P. Hayes
is an EFT practitioner and author, and she regularly hosts seven-day
tapping challenges where people can join live daily calls with Claire
and other participants.
Claire uses regular challenges to build her email list, explain what she
does in an interactive way, and create trust with her audience members.
Example #3: List-building challenge
For my business (BethHayden.com), I’ve invited my community members to
play along with me as I attempt to grow my list to 16,000 subscribers by
the end of 2016.
Email subscribers who sign up for the challenge get special updates from
me about my progress, including tips on what list-building tactics are
working and which ones are flopping.
So far, more than 500 people have signed up, so I know it’s a hot topic for my community members. You can sign up here.
How to design and host your own challenge
You don’t need to already have a huge email list to run a challenge, but
you do need to have some type of community already established.
If your list is small and you’re not connected with any influencers who
can help you promote your challenge, it might not produce the results
you want.
So, first decide whether or not you have a large enough audience for
your challenge to be effective. If you do and want to host a challenge,
follow the five steps below.
1. Identify your business goals
Before you begin brainstorming challenge ideas, think about what you’re
trying to accomplish — and how a challenge might help you achieve your
goals.
Are you trying to build your email list? Get media attention? Pre-sell a course you’re building?
Write down your primary goal, plus any secondary goals you might have.
2. Brainstorm challenge ideas and select the best fit for your business goals
Take 15 minutes and write down as many challenge possibilities as you
can. Then take a five-minute break and walk around the room or get a cup
of coffee. To generate even more ideas, try another 15-minute
brainstorming session.
Assess each of your ideas based on whether it will help you meet your
business goal, how difficult it will be to implement, and whether it’s
likely to be something that catches on with your audience.
Complete instructions for your audience, including when it will start and end
How you’ll entice people to join
How you’ll promote it to your email list, existing social media audiences, and influencers in your network
4. Host the challenge
Once you’ve set your details and announced the challenge start date, focus your content marketing efforts on promoting it.
Publish content related to the topic of your challenge, host webinars,
and talk it up on social media. Encourage your participants to share
their challenge results and get other people involved.
5. Evaluate the effectiveness of the challenge
After you wrap up your challenge, write down what went right, what went wrong, and how you can improve your plan next time.
Did you meet your business goals?
If you’d like to do another challenge (or run the same one again), set your next start date.
Engage and entertain your audience while growing your business
Challenges can be a fun and exciting way to generate buzz for your
business, engage existing subscribers, and build your email list.
As we’ve seen from the examples above, challenges can work for all
different types of businesses — so pick a smart challenge idea and run
with it!
Have you hosted (or participated in) a challenge you particularly enjoyed? Tell us about it in the comments below.
Do you want to reach more consumers with your Facebook ads?
Looking for creative ways to reach more people like your ideal customers?
Lookalike audiences allow you to build new audiences using an established source audience such as people who have viewed your video or previously purchased from you.
In this article, you’ll discover how to use Facebook lookalike audiences to successfully scale your ad targeting.
What Are Facebook Lookalike Audiences?
Facebook lookalike audiences are an advanced targeting option that goes beyond the basic interest and demographic targeting functionality. They’re currently the most effective Facebook targeting tool to find your ideal customer.
At the core of all lookalike audiences is a source audience upon which you build a lookalike audience. Facebook takes all of the data points of your source audience and finds new, similar people using a set percentage sample (which you specify) of the population in your chosen country.
Unlike interest-based targeting, lookalike audiences allow you to create the source audience, giving you more control. As a result, you end up with better-quality audiences because you can find new audiences that are almost identical to your existing ones.
Lookalike audiences are best used to target new cold audiences at the top of your sales funnel. For example, you could run top-of-funnel content campaigns to all of the lookalike audiences you build. This would start to warm them up as you take them from the top of the funnel to the bottom.
Now let’s look at how to create four types of lookalike audiences.
#1: Create a Video Lookalike Audience
Facebook users watch 100 million hours of video on the platform every day, so it should come as no surprise that video is Facebook’s best-performing content.
Video allows you to build brand recognition and trust with your target audience quickly. If you’re running a video-based content strategy and want to scale your campaigns to reach more people, lookalike audiences let you find new people based on those who’ve already watchedyour videos.
Before you can create a video lookalike audience, you first need to create a custom video audience, which will be the source audience for the lookalike.
Create a Custom Video Audience
Custom video audiences allow you to segment your viewers based on what videos they’ve watched and their level of engagement.
To create a custom video audience, open your Facebook Ads Manager and navigate to the Audiences dashboard. To do that, click the menu button and click All Tools.
Under Assets, click Audiences.
Next click Create Audience and select Custom Audience from the drop-down menu.
In the pop-up box that appears, you’ll see four custom audience options. Select Engagement on Facebook.
Next select Video.
You’ll see the box where you create your custom video audience. Select your engagement criteria from the Engagement drop-down list and choose the videos from which you want to build your audience.
Define the time period, give your audience a name, and click Create Audience.
You can create an audience for all video views at every engagement level: 3 seconds, 10 seconds, 25%, 50%, 75%, and 95%. To create each one, repeat the process outlined above for the different engagement options.
Build a Video Lookalike Audience
Now you’re ready to create your video lookalike audience. Navigate to the Audiences dashboard in your Ads Manager just like you did when you created the custom video audience. Then click Create Audience and select Lookalike Audience from the drop-down menu.
In the Create a Lookalike Audience box, you’ll see three fields: Source, Country, and Audience Size. For the source, select the custom video audience you created in the previous step.
Next choose your country. This is typically the country in which the majority of your source audience is located. For example, if you work predominantly with UK-based businesses, any lookalike audience you create will be in the UK.
Finally, select your audience size. Audience sizes range from 1% to 10% of the total population in the country you choose, with 1% being those who most closely match your source. You may want to start at 1% and increase the audience size when you want to scale campaigns to reach more people.
When you’re finished, click Create Audience. You’ll receive a notification when your lookalike audience is ready to use, which could take up to 30 minutes.
#2: Set Up Email List Lookalike Audiences
Email-based lookalike audiences often deliver the best results. Why? Because you can take your existing customer list and use that as the source for your lookalike audience, essentially cloning your customer base.
As with video lookalike audiences, first you’ll need a custom email audience of your subscribers/customers before you can create an email-based lookalike audience.
Create a Custom Email Audience
Navigate to the Audiences dashboard, click Create Audience, and select Custom Audience from the drop-down menu. In the first pop-up box, select Customer File.
You have two options for adding your email data: upload your data as a file/copy and paste the data, or import it from MailChimp. If you’re uploading your email list, click Choose a File or Copy and Paste the Data.
Next upload the email list (which is a CSV file in the example).
Then map your identifiers. The more identifiers you use the better match rate you’ll see. In the example, we’ll use First Name, Last Name, and of course, Email Address.
After you click Upload & Create, you’ll see a progress bar and how many rows of data were successfully uploaded.
Now under Next Steps, click Create a Lookalike Audience.
Build an Email Lookalike Audience
In the Create a Lookalike Audience box that opens, you’ll see your custom email audience in the Source field.
Select your target country (from which the majority of your email list comes) and choose the audience size. Consider starting with a 1% lookalike audience and scaling from there. Then click Create Audience.
#3: Create Conversion Lookalike Audiences
Conversion lookalike audiences let you find new target audiences using a website custom audience of people who have completed a specific conversion event.
For example, if you’re an ecommerce business running a discount code lead magnet, create a website custom audience of people who have triggered a lead event action by opting in for the discount code. Then use that audience as the source for your lookalike audience.
Before you can create the source audience for your conversion lookalike audience, make sure that you’ve set up and installed conversion tracking.
As with video and email lookalike audiences, you need to create the source audience first. It will be a website custom audience of people who have completed a specific event action.
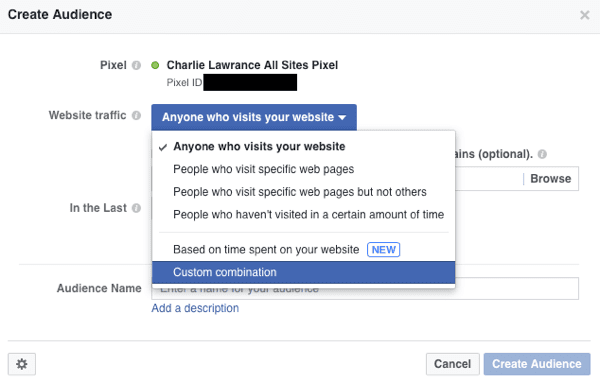
Create a Website Custom Audience for Conversions
In the Audiences dashboard in your Facebook Ads Manager, click Create Audience and select Custom Audience from the drop-down menu. In the pop-up box, select Website Traffic.
From the Website Traffic drop-down menu, select Custom Combination.
Click the URL drop-down menu and select Event.
Choose the event you want to create the audience from (Lead, for example). You’ll see a list of event actions you’re currently tracking using the Facebook pixel.
In the field called In the Last, enter the time parameter for how long people will stay in your audience once they’ve completed the specific action. For example, you might choose 120-180 days to have the maximum number of people in your audience.
Finally, make sure the Include Past Website Traffic box is selected, give your audience a name, and click Create Audience.
Build a Conversion Lookalike Audience
Now navigate to the Audiences dashboard, click Create Audience, and select Lookalike Audience from the drop-down menu.
In the Create a Lookalike Audience box, choose your website custom audience from the Source drop-down list.
Then select your country and choose the audience size (1% is a good place to start).
Finally, click Create Audience and wait for Facebook to build your lookalike audience. Once it’s ready to use, you’ll receive a notification and it will appear in your Audiences dashboard.
#4: Construct Page Likes Lookalike Audiences
Lookalike audiences for page likes are the easiest to set up because you build them from the fans of your Facebook page. If you have a large number of Facebook fans who actively engage with your organic posts, a page likes lookalike audience is a great way to find new similar target audiences.
Differing from the three lookalike audiences above, you don’t need to create a custom audience for your source audience.
In the Audiences dashboard in Facebook Ads Manager, click Create Audience and select Lookalike Audience. In the Create a Lookalike Audience box, select your page name from the Source drop-down list.
Then choose your target country and select your audience size.
Tip: With all lookalike audiences, the larger the source audience, the better quality the lookalike audience will be (since there are more data points to use). A general guideline for building lookalike audiences is that the source audience must have at least 1,000 people in it.
Conclusion
One of the advantages of using lookalike audiences is the ability to scale your campaigns quickly and easily. Because you create lookalike audiences based on a percentage sample of people in your target country (from 1% to 10%), you can start with a closely defined 1%, and as you reach higher ad frequency, introduce the 2% audience, and so on.
Compare this approach with interest-based targeting, which is more hit and miss when you have to create new audiences from different related interests.
What do you think? Do you use Facebook lookalike audiences for your Facebook ads? Please share your thoughts in the comments below.