Showing posts with label Social Media Posts. Show all posts

Thursday, 19 July 2018

What’s the Ideal Social Media Post Length?


Social media post length is a definitive factor is deciding the impact of your social media content on its viewers. Any post that is wordsmithed to fit character limits will fully display your social media content to your fans, without obscuring any information. And that is integral to earning social media engagement. With the knowledge of ideal post lengths (mentioned below) and a reliable social media management tool, you can post optimized social media posts consistently.
This blog post is a curation of research concerning post length on various social networks. Let’s begin with the biggest and most popular social media platform – Facebook.
Note – This post discusses 2 numbers –
1. The ideal length of social media posts (recommended for optimum engagement), and
2. The maximum character limits that different social platforms allow
 
Screenshot 2018-06-05 13.34.45

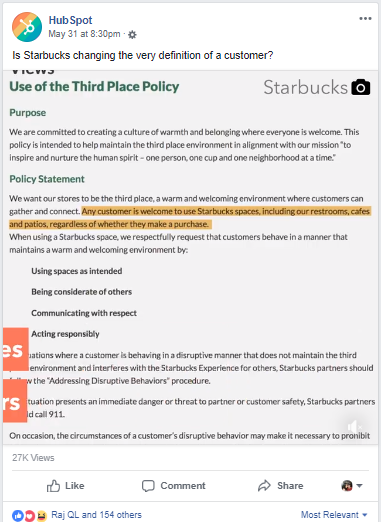
The ideal Facebook post length

There are different types of posts that you can publish on Facebook – organic, paid and video. Each of those types has its own layout on Facebook and ideal post length. Here’s a short summary of posts types and their optimal lengths.
Organic posts – Between 40 and 80 characters. According to MarketingProfs, Facebook posts that are under 40 characters get 86% engagement. Jeff Bullas corroborates that research but extends the ideal character limit by stating that Facebook posts with 80 characters or less get 88% more engagement.
Paid posts – Paid posts can be broken down into a headline, a body and a link description. Here are the ideal lengths for each of those elements, according to an Adespresso study.
Ideal length of Facebook ads
  • Headline – 5 words
  • Text – 14 words
  • Link description – 18 words
Facebook paid posts are about taking action, which is why it’s natural for copywriters to craft shorter headlines and descriptions. However, you should pay attention to copy on organic posts as well, keeping them crisp and action-prompting where possible.
If you’d like to learn more about copywriting for social media posts, here’s a useful read – 3 Secrets of Top Copywriters That Can Transform Your Content Marketing.
Facebook Character Limits or Maximum Character Lengths
If you wished to, you could publish a Facebook status that was 63,206 characters long! But that length is far from ideal. Here are a few other maximum character lengths that are noteworthy.
  • Facebook username character limit – 50 characters
  • Facebook Page Description – 155 Characters
  • Facebook Comments – 8,000 Characters


Facebook image ads –
  • Headline – 40 characters
  • Text – 90 characters
  • Link description – 20 characters


Facebook canvas ads –
  • Text – 500 characters
  • Button Text – 30 characters


Facebook lead generation ads –
  • Context card headline – 45 characters
  • Benefits text – 5 bullets with 80 characters each
  • Button text – 25 characters
  • Custom question text – 50 characters
  • Privacy policy link text – 100 characters
  • Custom disclaimer title – 60 characters


Facebook collection ads –
  • Headline – 25 characters

The ideal length of Facebook Videos 
Facebook support video upload of upto 120 minutes, but it’s advisable to steer clear from publishing anything that long unless it’s a Facebook exclusive feature film. 44% of 30-60 sec videos are viewed completely, according to a study conducted by Kinetic Social. Plus, 33% Facebook users prefer shorter videos that are between 30-50 secs long.
The ideal length of Facebook video ads –
  • Text – 90 characters
  • Headline – 25 characters
  • Link description – 30 characters
 
Screenshot 2018-06-05 13.37.46

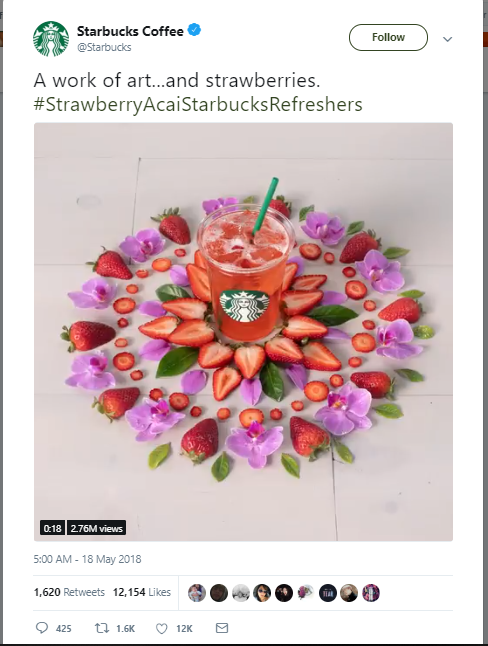
The ideal Twitter post length

In 2017, Twitter increase the character limit of tweets to 280 characters. Since then, Twitterati have become more active on the social network claims product manager Aliza Rosen. This is probably because 280 characters allows more room for Twitter users to share their thoughts. But this added space doesn’t mean that other Twitter users want to see longer tweets.
According to a study conducted by Buddy Media, the ideal tweet is less than a 100 characters long. The study finds that such tweets receive 17% more engagement. So yet again, shorter content is better received by social media users. This is partly because shorter tweets are easier to read and comprehend, but also because shorter tweets give retweeters extra room to add their thoughts.
The ideal hashtag length
According to Vanessa Doctor from hashtag.org, hashtags that are 6 characters or one word long perform better. Once again, comprehension is the concern. Hashtags don’t allow spaces and exceptionally long hashtags are hard to read and comprehend.
Twitter character limits or maximum character length for Twitter posts
  • Tweets – 280 characters
  • DMs (Direct Messages) – 10,000 characters
  • Handle – 15 characters
  • Profile name – 20 characters


In short, concise content performs better on Twitter. Note that the character limits for Twitter have been extended to allow more content, but that doesn’t necessarily mean that longform content will ever be well received on the microblogging social network.
Screenshot 2018-06-05 13.39.40

The ideal LinkedIn post length

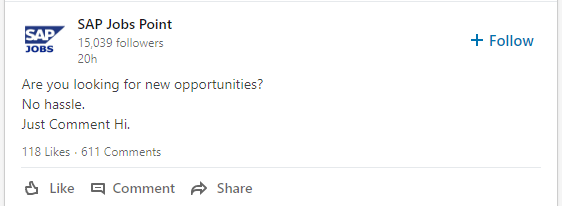
At 500 million users and 10 million job postings, LinkedIn is a fairly noisy social media platform. As the social network grows its user base, social media marketers will find it tougher to earn organic attention via LinkedIn posts. Marketers should continue to optimize the quality, timing and delivery of LinkedIn posts so they can make the most of their brand’s LinkedIn presence.
There isn’t much research on ideal length of LinkedIn posts, so we have to rely on how posts appear on LinkedIn to decide ideal post length. For instance, if your LinkedIn status update is longer than a 100 characters, the excess text gets cut off and a Show More button appears. So it makes sense to keep your LinkedIn status updates under a 100 characters or 25 words.
  • LinkedIn status update – 50-100 characters ( organic and paid)
  • LinkedIn post titles – 40-49 characters (according to OkDork)
  • Number of images – 8 (Source – OkDork)
  • LinkedIn articles – 1900 to 2000 words (Source – OkDork)
  • Article subheads – 5 per post (Source – OkDork)
  • LinkedIn videos – under 30 seconds (Source – LinkedIn)


LinkedIn character limits or maximum character length for LinkedIn posts
  • LinkedIn Publishing post headline – 150 characters
  • LinkedIn Publishing content length ~ 120,000 characters *
  • Company update – 700 characters
  • Company name – 100 characters
  • About us (Summary) – 2,000 characters
  • Page name – 50 characters
  • Company leaders headline – 150 characters
  • Company leaders description – 150 characters
  • Employee testimonials – 400 characters
  • Custom module title – 150 characters
  • Custom module body – 500 characters
  • Custom module URL label – 70 characters
  • First name – 20 characters
  • Last name – 40 characters
  • Recommendation – 3,000 characters


* As per SproutSocial’s experiment, LinkedIn cuts you off once you reach 120,000 characters on LinkedIn articles.
Screenshot 2018-06-05 13.41.11

The ideal Instagram post length

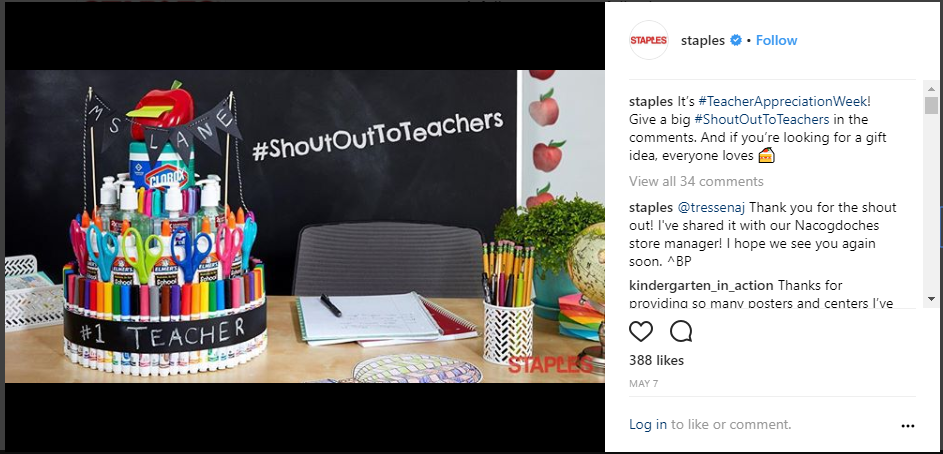
Unlike the other social networks on this post, Instagram was built to promote visual content. However, the right combination of words and hashtags can help your Instagram posts maximum engagement, which can earn them the top position on users’ feeds.
  • Instagram captions – 138 -150 characters
  • Instagram ad captions – 125 characters
  • Number of hashtags for captions – 5 -10


However, it’s not a great idea to add irrelevant hashtags to your posts, just to increase its visibility. That may result in your shadowban on the social network. According to TrackMaven, posts with exactly 9 hashtags receive the most engagement.
  • Number of characters in a hashtag – 24 or less

If you notice the captions added by top brands on Instagram, you’ll notice that most captions run short. Most captions that perform well also create context, showcase the brand and prompt viewers to take action.
Instagram character limits or maximum character length for Instagram posts
  • Instagram caption – 2,200 characters
  • Bio – 150 characters
  • Username – 30 characters


Wrap
Social media post length is an important factor in deciding your social media engagement. WIth an optimally worded social media post, you can make an impact on your target audience on different social media platforms. Use the info shared on this post to decide what lengths of captions and post descriptions to incorporate in your social media content.


Friday, 1 September 2017

11 Formatting Tricks to Get More Social Media Engagement


Social media is evolving fast. Just a few years ago, a marketer’s success on social was measured by how big an audience they had. Not so much anymore. Now “engagement” is the new goal for many marketers – especially the smart ones.

Why the focus on engagement? Because it doesn’t much matter if people just see your posts in their social media feeds. Sure, it’s good – but what you really need is results. Business results.

To get those results, marketers have to get to first base with their social media posts. They need clicks and shares and comments. In other words, they need engagement.

But here’s the rub: Engagement can be hard to get. Even a “great” engagement rate is 2%, which means only one in fifty of the people who see your post engage with it. An average engagement rate would be more like .05-1.0%, and often less.

Fortunately, there’s lots you can do to at least improve engagement rates. You can:

  • Never, ever buy followers
  • Create the best content possible
  • Offer a great product or service people love
  • Share at optimal times
  • Format your posts for optimal likes, shares and clicks
In this post, we’re focused on the last option. Ends up, there’s been lots of research on how to format social media posts to get more engagement. Even if you can’t do any of the other items above, just applying a few tips from here will help.


1. Customize posts for each social media platform.


If you get only one thing out of this article, get this: Customize every post for the platform it’s getting published on. In other words, don’t use a social media automation tool to just publish exactly the same post to every platform. You’ll get rotten results.


2. Embrace Facebook.


Even if you’re in B2B. I know there are some people who don’t like Facebook, but the reality is that 90% of sharing is happening there. It’s time to accept that and act accordingly.


3. Headlines are important!


For platforms that include headlines, try to include a tidbit of what’s in the meat of the content – especially if you can add some mystery to it. Some of you will recognize this as an Upworthy trick, but it works all over the internet.

So instead of just posting “15 Ways to Get More Shares”, try something like “15 Ways to Get More Shares – #7 is only for the brave”

Also, be sure you use headlines that fall between the optimal range. 

A study from Refinery29 found “the optimal length of a headline for social engagement is 25 to 55 characters and has 4 to 10 parts of speech.  Articles within this range average about 20% more shares.”


4. Keep it brief


According to BuzzSumo’s study of Facebook engagement (they analyzed – gulp – one billion posts) “Short form text posts of less than 50 characters get the most interaction.”

With Twitter, the character limit obviously means this is standard practice as well.

If you have more to say, well, read on. We’ll get to a clutch formatting tip in #11.


5. Add commentary.


LinkedIn and Facebook allow for longer posts. LinkedIn is also a business platform, so there’s more of an expectation for you to relay your expertise.

So go one step beyond just sharing content – add some commentary and insight.

Maybe even some controversy, just be sure you keep it brand relevant… AND appropriate.


6. Directly upload your videos to Facebook.


In other words, don’t reshare them from YouTube. Upload them directly to Facebook (aka make them “native” in social media lingo). Uploading videos directly to Facebook has been shown to get up to 52 times as many views as videos uploaded to YouTube and then shared on Facebook.


7. Share images.


You’ve heard how visual content gets like 2.5 times more engagement than text-based content on social media, right? Well, recent research from Post Planner backs this up in spades:


Need a great tool to really bring your social media images to a new level? Check out Social Studio FX – an all-in-one graphics and advertising suite optimized for social media platforms.

Your engagement will thank you
🙂


8. Post your images via Instagram.


In contrast to tip 6, everything is different when it comes to images. According to BuzzSumo’s study, it’s been proven that “Posting images via Instagram appear to provide a 23% increase in engagement.”


9. Hashtags. To use or not to use?

  • Facebook: Skip the hashtags. This advice comes from that BuzzSumo study, but also from quite a few Facebook experts. Not everybody says to skip hashtags on Facebook, but you should know there’s dispute about this.
  • Twitter: Use ‘em. Aim for about two hashtags per tweet. Any more than that may reduce engagement.
  • LinkedIn: Skip the hashtags. They don’t work on LinkedIn.
☹
  • For Instagram: Use hashtags like there’s no tomorrow. Okay, maybe not that much. But up to eight to ten hashtags on Instagram is not overkill.

10. Switch up the types of content you share.


Don’t ALWAYS go for images. This is even true of Instagram. Share some videos or some animated gifs.

On other platforms, integrate some text-based posts too. You can even share SlideShares on Twitter.
Content variety keeps things interesting for your followers.


11. Break up your copy.


Want your posts to stand out? Space out the writing. Especially when it comes to Twitter or Instagram.

On Insta, use the dots or periods that have become oh-so familiar:


For more tips on Instagram spacing, click through to read this post on ShortStack.

On Twitter, hit return more often. For example, this:


Making the leap when life is hard. My entrepreneurial journey thus far http://bit.ly/1RMjqSb #uncareer #women
Could be like this:


Making the leap when life is hard.

My entrepreneurial journey thus far
http://bit.ly/1RMjqSb
#uncareer #women

Use formatting tricks


You could spend a lifetime studying how to get more shares on social media, but the tips above will get you started. We recommend that you grab a tool designed to optimize your social media posts.

Next, experiment with some of the tips mentioned here and begin testing and tracking how your posts perform. You never know which one might work best for your audience!

Have you noticed any particular formatting trick consistently gets more shares? Share your wisdom! Leave a comment and tell us what you’ve learned.


Source

Thursday, 31 August 2017

5 Killer Facebook Tips to Get You Started


YOU heard the buzz about Facebook, and you decided to jump into the mix with a business page of your own. But things aren’t going quite as well as you hoped.
Not to worry. We’ve compiled this list of tips to help you take your Facebook presence to the next level, even if you’re just getting started.

1. Know When to Post

 This isn’t Twitter, where you want to post dozens of time a day. With Facebook, less is more. It’s important not to spam your audience with constant updates.
Around three posts per day seems to be the sweet spot in terms of overall reach and engagement. Anything less or more than that will not be as effective.
Just as important is the times that you post. Facebook sees the most amount of traffic between normal working hours, from around 8am to 6pm. That means there are tons and tons of stories and updates filling the average feed.
Rather than try to fight against the endless stream of content during this period, you can actually get more engagement by posting before or after these times. The evening, in particular, tends to be a great time to post. Of course, if you’re targeting customers from around the country (or world), you’ll have to account for time zone differences as well.

2. Use These Formats

The format you use when posting can have a huge affect on how well a particular post performs. Taking just a few extra minutes to use the right setup upfront will save you tons of marketing time in the long run.
Keep these things in mind when structuring a post:

Posts with images perform better

People love visuals, so make sure you give it to them. Generally speaking, posts with images will get you more clicks, likes, and comments than posts without them. And if you really want to get the best results, you won’t just use any ol’ stock image.
The images that perform the absolute best are custom graphics designed specifically for your post. When possible, design and customize your own images, rather than using something generic.

Always use link posts

When linking to your site (or someone else’s), you have two main options. You can format the post and insert the url manually, or you can use a link post and let Facebook handle the formatting for you. By simply adding the site address, Facebook will pull an image and a small selection of the site’s text and display it for you.
This may not seem like such a big difference at first glance, but the truth is that these link posts are heavily preferred by both your audience and Facebook. That’s why it’s always in your best interest to use link posts.

Ask questions

People use social media to, well, socialize. That means engaging, connecting, sharing, and communicating. To tap into this market, you want to reach out to them in the same way.
One easy but effective way of doing this is by using your posts to ask questions. It not only serves as a call to action, it lets them know you’re interested in and listening to what they have to say.

3. Choose Your Audience

 Many savvy marketers choose to take advantage of paid Facebook ads to get their message in front of as many people as possible. This can be a great idea… but you have to make sure you’re getting your money’s worth.
This means targeting the right audience, the people who are actually interested in your message and likely to pay for your product or service. If you’re selling to expectant mothers, for instance, every dollar spent on an ad targeted towards single men in their early 20s is a dollar wasted.
You need to understand who you should be targeting, first of all. But from there, Facebook provides a variety of features that let you make sure only specific fans or demographics are seeing your ads. You can even limit it to people who have visited your website in the past.

4. Pay Attention to Your Results

 How did we learn all this stuff? Easy – we analyzed our results. And you should too.
Keep track of which posts do the best and which posts do the worst. What are their common elements? What could you have done better? Don’t just throw a post up there and hope for the best.
Note the format, the time, the topic, and every other little tidbit you can. This may seem meticulous, but it will help you find the patterns for what works and what doesn’t. Facebook’s Audience Insights feature makes this way easier, allowing you to even break your followers down into demographics, like age, gender, and location.
If you’re using paid ads, you should definitely be split testing as well. This is when you run multiple ads, all with slight variations. Then you compare which ads did the best. If you do this again and again, you’ll eventually end up with a truly effective advertisement.

5. Use a Post Scheduler

 Even when you’re only posting a few times a day, it can be hard to set aside time to post perfect content at the perfect hour, day in and day out.
This is where a post scheduler comes in handy. Simple create your posts, choose a time, and go about your day. The scheduler will make sure you’re sharing what you want, when you want it – without requiring you to be glued to your computer or smartphone 24/7.
It’s a straightforward but invaluable tool for anyone trying to market on Facebook.

Face Facts

There you have it, the basic nuts and bolts of many successful Facebook campaigns to come. Each tip you use will build upon the other, until your brand becomes a veritable social media force.
And as you try them for yourself, you’re certain to learn more about what works and what doesn’t through experience. The only thing left is to get started!

Tuesday, 8 August 2017

How to Back Up Your Social Media Content


 Do you have valuable social media posts you don’t want to lose?
Want to learn how to back up your social media profiles?
Downloading your social media profiles, content, and contacts will ensure you always have what you need to keep your business running, no matter what platform or features come and go.
In this article, you’ll discover how to download copies of your social media content and profiles.


Why You Need to Back Up Your Content

It’s important to back up your social media and long-form content both locally and to the cloud, whether it’s Google Drive, Dropbox, or other storage networks. Here’s why:
You never know when the server that houses your content might go down, meaning a delay in delivery or loss of your main website, blog, and other content. Or what if a site you’ve been contributing content to gets shut down, sold, or otherwise changed to where your content is no longer published?
Also consider the possibility that a social network might turn off a particular feature or the entire network itself (Blab, for example). Imagine spending years building up your blog using Facebook Notes or LinkedIn Publisher just to find out one of those services is being turned off?
If you start backing up your content now, you’ll be in better shape than many of your marketing colleagues in handling unforeseen events. You’ll also get more awareness of your content as an added bonus.

#1: Save Your Long-form Content

The next time you write a blog post, no matter what word-processing program or CMS you use, save the final version of your content to a Word (or other) document that you can save locally and to a cloud-based file service. For example, if you write long-form content in Google Docs, download the file as a Word doc when you’re finished.
If you’re a content producer who typically writes content for one main outlet (website or social network) and uses the rest of the social and blogging networks to promote that content, you might want to use a special naming convention to save it:
  • Publication Outlet 1 – Title 1
  • Publication Outlet 1 – Title 2
  • Publication Outlet 2 – Title 1
  • Publication Outlet 2 – Title 2
  • LinkedIn Publisher – Title 1
  • LinkedIn Publisher – Title 2
  • Facebook Notes – Title 1
  • Facebook Notes – Title 2
  • Medium – Title 1
  • Medium – Title 2
Now, suppose you find out Publication Outlet 2 has closed its doors or Facebook decided to turn off the Notes feature. Because you’ve saved your posts from that publication (or that feature) on your Google Drive and local hard drive, you don’t have to scramble to save your content or worry you’ve lost it.
Your backup system also helps you maintain a library of topics and sites where you’ve published so you can more easily keep track of your content. For example, if you’ve been creating text-only content but want to start doing video, go through your Google Drive or local hard drive to see what topics you’ve done as posts and create videos for them instead.
Your content library also comes in handy for repurposing content. For example, let’s say that Publication Outlet 1 is your blog. Some blogs will allow you to republish posts from your blog to theirs.
You could also take your posts and publish them to your LinkedIn Publisher, Facebook Notes, Medium, and other networks. Not only will you get more visibility for your content, but you’ll also ensure that if one website or network goes down, your audience can always find your content elsewhere.

#2: Back Up Your Mobile Videos

Whenever you create videos on your smartphone for Snapchat, Instagram, Facebook, YouTube, and so forth, it’s important not only to upload the videos to those networks, but also to save a copy of your social videos to your smartphone after recording or after the video is published.
For example, after you finish a Facebook Live video, depending on the smartphone app you use, you may see a screen like the one above prompting you to save your video with the download icon (to the right of the blue HD Upload On button in the image).
Or after you record a segment of an Instagram storysave it by tapping the Save icon at the bottom left.
At the end of the day, download your entire Snapchat story as a video by tapping the download icon to the right of your story.
You may be able to reshare these videos on other video sharing networks, depending on whether they allow you to upload video from your phone. For example, upload a good Snapchat story to Facebook to encourage people to follow you there and engage your Facebook fans.
The same thing goes for non-mobile video content: back up non-mobile videos locally and to the cloud. Don’t trust it to just one social network. If there’s a way to download the video (like Blab used to allow video hosts to download audio and video files of their blabs), do it. Or look for browser extensions that let you scrape video content on a page if you have to. Don’t lose your videos!

#3: Capture Testimonials

You may remember a time when LinkedIn company pages had an option to capture your customers’ product and service recommendations. It was a wonderful way to get testimonials for your business until LinkedIn decided to shut the feature down (when they turned off the Products & Services tab on company pages).
Businesses lost all of those recommendations they spent time collecting.
That’s why you need to find a way to capture your testimonials. For testimonials on social media, start by taking screenshots of them (with a tool like Jing) and saving them to your hard drive.
Browser extensions like Open Screenshot (for Chrome) allow you to capture an entire web page, which is helpful for capturing your complete list of LinkedIn recommendations. Be sure to expand all of your recommendations first.
The screenshot will end up looking something like this:
Use this technique to capture entire pages and profiles and then crop them to the sections you want to feature, such as recommendations from LinkedIn on your website. Use individual recommendations for specific products or services, or the entire screenshot for a testimonials page.
Of course, you also need to consider testimonials on other websitesSave the Facebook posts, like the tweets, heart the Instagram photos, recommend the Medium posts, and otherwise find a way to capture all of the positive social media comments about your business, products, or services.
Once you’ve done this, you can either use the screenshots themselves or services like Spectoos to display testimonials from a variety of social media and other sources in a more consistent format. You can embed this as a widget or a full-sized testimonial page. If you have good reviews scattered about, this will help you put them all in one place, neatly and 100% verifiable.
Business Directories and Review Networks
If you’re a local business, apply this same advice to business directories and review networks. For example, it’s a great way to back up your Yelp reviews or unhide those positive “not currently recommended” reviews (which you can find by clicking the link at the bottom of your first page of Yelp reviews).
If your “not currently recommended” reviews are mostly negative, you probably shouldn’t draw attention to them. If they’re mostly positive, you probably should. It all depends on what’s hidden there.

#4: Download Profiles and Pages

Several social media networks allow you to download your profiles and pages. Here are a few of the many download options for the top social networks and why you should use them.
Facebook Personal Profile
treasure trove of information is available for your viewing pleasure in your Facebook settingsClick the link to download your profile data.
On the next page, click Start My Archive. Depending on how much content you have on your Facebook profile, it may take a while to process your archive.
You’ll get an email from Facebook when your file is ready to download.
When you unzip your download, you’ll find three folders: photos, videos, and HTML. These folders support the main index.htm document.
If you click on the index.htm file, you’ll see a stripped-down, text-based version of your Facebook profile data. This is the way Open Graph sees your profile.
You also get the Facebook-optimized versions of media (images and video) you’ve uploaded to your Facebook profile.
Facebook Business Page
The process to download your Facebook business page is similar to your profile. Go to the General tab of your main page settings and click the Edit link next to the Download Page option.
Then click a series of links and buttons, prompting you throughout the process.
When your archive is ready, you’ll receive a notification.
The download file for your Facebook page will have more folders than your Facebook profile download…
…but it contains similar information in a similar format.
Unfortunately, you don’t get the Holy Grail, which is a list of your fans. You actually get more engagement information (such as the comments on photos you’ve posted) from your Facebook profile archive than from your Facebook page archive.
Twitter Profile
On your main Twitter account Settings page (or on the covert Twitter Data page under your Twitter account settings), click the option to download your Twitter archive.
Then click Request Your Archive.
When it’s ready, Twitter will send you an email directing you to download your own unique Twitter archive with stats from your first tweet to today.
Or you can get all of your tweets in a CSV file.
LinkedIn Professional Profile
LinkedIn has two options for downloading your LinkedIn profile data: a 10-minute quick option and a 24-hour detailed option. You can find out more about the amount of information you receive for each option in LinkedIn’s Data Export article.
To request your archive, click your LinkedIn profile and select Privacy & Settings. Under Account > Basics, click the option to get an archive of your data.
Note that the 10-minute option could take longer, depending on the size of your account, number of contacts, and so on. Effectively, with either option, LinkedIn condenses your profile into CSV files.
Having your connections’ email addresses (in the Connections.csv file) is especially important. If you were to lose your LinkedIn account, you could use those email addresses to reconnect with everyone. You can also add those email addresses to your advertising custom audiences. Just don’t add them to your email marketing list!
Other Networks
The ability to download the information from your social profiles and pages lies in your settings. If you have profiles or pages on networks where you’re sharing a lot of content that isn’t included in your Twitter, Facebook, or LinkedIn backups, be sure to look for other ways to make your content reusable, rather than just one-time use.

#5: Export Your Contacts

Last but not least, think of every source of contacts you have. Export and download your contacts from databases and email lists (Gmail, Outlook, Salesforce, GetResponse, etc.) on a regular basis.
You never know when your account could get messed up and your valuable business contacts lost forever. And you can always use those email addresses for retargeting with Facebook custom audiences, Twitter’s tailored audiences, and so on.
What This Means for Your Business
Is there ROI in backing up your content? Maybe not. But if you ever lose content due to a particular website going down, that’s wasted hours of someone’s time on your dollar. So if you’re not backing up your content, you’re losing money and hurting your overall ROI. Gain ROI by keeping your content safe and looking for ways to repurpose it, or simply let it inspire you to create more!
In Conclusion
While it may seem a bit paranoid, you don’t want to find yourself locked out of a social account without access to your most valuable pieces of content and out of reach of your powerful relationships. Make sure you set a reminder on your calendar for regular social media, content, and contact backups.
What do you think? What tactic do you find most useful when backing up your social network or content marketing? Let us know in the comments!