Showing posts with label Opt-In Form. Show all posts

Wednesday, 3 July 2019

Growing and Nurturing Your Email List


Every now and then, I see an article that suggests email marketing is dead; however, this is far from the truth.  I’ve met many home business owners who say the majority of their income comes from their email subscriber list. If your list isn’t producing results, it may not be because email is dead. It’s more likely that you’re using it wrong. Here are tips to growing and nurturing your email to increase profits.

Growing Your List

Part of the success in email marketing is to have a list that is growing. Many people I’ve met who are struggling with email marketing have a stagnant or shrinking list. Here are some tips for growing your list:

1) Have opt-in forms on every page of your site. For example, if you have a WordPress blog, have an opt-in list sign-up form in your sidebar. You might consider having one at the end of your content as well.

2) Entice them to sign up. Offer a freebie such as a report or video for signing up for your list. Let visitors to your site know what the freebie will do for them. So many online businesses simply have a form that says “Sign-Up to Get Updates,” which isn’t a compelling reason to join. Some online business owners indicate what their incentive is, but not in a way that entices people to join. Instead of saying, “Get my free report on how to lose weight,” say, “Start losing weight today!
My free report will tell you how!”.
3) Promote your incentive on social media. Most social media platforms have areas you can include information about your list and offer in the profile. You can promote the list itself, but you’re more likely to get results by promoting the free offer. Which would you respond to: “Join my list to learn about saving money!” or “Get ‘52 ways to save $1,000 a Month’ free.”

4) Include information about your incentive in your bios and emails. If you guest blog or appear on someone’s podcast or website, make sure your bio includes information about your incentive. Every email you send should mention your free report in the signature line.

Nurturing Your List

Growing the list is only one aspect of email marketing. Once they subscribe you need to provide value or they’ll unsubscribe. Nurturing an email list is a delicate balance of staying connected without overwhelming subscriber’s inboxes. Even more important than keeping on the list, is having them eager to open the email to see what you have to share. Here are tips for making your list an effective marketing tool:

1) Email often enough that subscribers remember you, but not so often you annoy them. This number depends a great deal on your home business. Most successful email marketers I know email two to three times a week. Emailing even just once a week, may not be enough.

2) Be you. The most successful marketers know that their effectiveness comes from selling themselves first.
Put another way, people will connect with and want to buy from you because of who you are. Your subscribers have many options for who to do business with, but if you can make a connection, build rapport and trust, they’ll choose you. So don’t be afraid to share stories and true-life anecdotes.
3) Give value. Whatever you email to your subscribers should enhance their lives. Money always follows value.

4) Make list members feel special. People who give you their name and email should be treated with the respect they deserve. Make sure they know it by thanking them as well as giving them things that no one else gets. For example, I provide a freebie every Friday that only my subscribers receive. It’s my way of thanking them and acknowledging that having their email is a big deal. 


Wednesday, 31 January 2018

How to Use Email Marketing to Grow Your Business


 Using email marketing is one of the most important aspects of growing your online business because it allows you to build a loyal list of customers who trust you. It offers you the opportunity to upsell your customers on products or services you are not promoting on your website.

In fact, email marketing is so powerful that it can quickly bring growth to your business if you do it well. When you build an email list, you will have an entire community that is different from those who converge on your website. It means that they have willingly opted-in to receive more
information from you. You can endorse your products, recommend other products, and even sell them high-priced items.

Moreover, email marketing is a flexible and convenient way to grow your online business. However, before you start sharing anything with your subscribers, you have to do a test to determine how often you should market to your subscribers. You also have to test different kinds of email content to see which will convert well.

After reading this article, you should know what email marketing is all about and how to make use of it in growing your online business.

How to Setup Your Email Marketing Campaign


Step #1: Choose an Email Provider


The first step you need to take is to select an email provider. You can choose from several email providers with varying account features and fees. You may want to start with a free account to test things out first.

When you first get started, you will probably only have a small subscriber base; most start with less than a hundred subscribers. MailChimp is a popular provider that gives you the option to start with a free account. Once you grow your subscriber base past a certain threshold, you would have to upgrade to a paid account.

Another very popular email provider is Aweber. Aweber offers lots of features, and is very inexpensive which is helpful especially when you are just starting out. Aweber offers custom templates for a newsletter, automation of blog updates, creation of multiple lists, and other useful features. If you have fewer than 500 subscribers, you would start with an account fee of $19 a month for unlimited emails. Since Aweber also uses a sliding fee scale, the more subscribers you have, the more you pay.

Step #2: Setup Email Lists


In order to grow your business, you need to create an email list. Your blog readers can sign up for your email list on your blog to read more of your content or receive updates about things you don’t post on your blog. You need to focus on this list as it will be how you bring people into the foremost part of your sales funnel.

If you already have a client base, you should create a separate list for them. As clients, they will need more diverse content than new subscribers. Since you have already established a relationship with them, it will be much easier to offer them new products and services.

To make your email lists more successful it is important that you do not spam them with too much content. That is why we mentioned in the introduction that you should first determine how often you should market or send content to your list. Doing this properly will help you to retain your list members for a long time.

Now that you have a list in place, what are the things you can offer your subscribers?

You can offer your subscribers information such as tutorials, a guide, white paper, or a training course in a monthly newsletter. This is the sort of content your readers will be glad to have in exchange for their email addresses. You can use a collection of the posts on your blog to develop a tutorial or a training course or design a professional PDF file or a powerful PowerPoint presentation.

Another way is to hire a ghostwriter to write a white paper or a guide for you. Once you have this ready, you need to show your visitors how to get the guide or the training course by displaying it conspicuously on your website. You can do this by creating an opt-in form on your website.

Step #3: Creating Opt-in Forms on your Website


Now that you have learned how to create an email list and what to offer your subscribers when they join your list, you need a way to obtain their email addresses.

Depending on your email provider. there are different opt-in forms that you can create to obtain email addresses. Essentially, you should have at least one opt-in form on your website. The most popular is the sidebar opt-in form that goes in the right or left corner of your blog. Research shows that the right corner converts more than the left side so you might want to keep that in mind when selecting the placement of your opt-in form.

Another popular opt-in form placement is below every post on your website. This can be very effective because it can serve as a call to action. Your readers have just finished reading your post, and they can easily subscribe to see what else you have to offer or read more of your posts. This is where the guide or training course you have created earlier comes into play. Simply use a call to action such as “Subscribe to this blog and get free access to our guide/training course as well as exclusive information only available to subscribers.”

#4: Build a newsletter for your subscribers


While most of the content that goes on your website will automatically be available to your email subscribers, a newsletter takes things a step further by ensuring that your subscribers can have access to exclusive information only available to subscribers. However, you have to make this content unique and helpful.

If you want your customers to appreciate your content, make it a habit to send them the newsletter every month. Package it with lots of actionable, useful content—which you can easily come up. You will be providing value to your subscribers while growing your online business.

Conclusion


If you use email marketing right, you can easily build different income streams for your online business. This ultimately will give you more capital to expand and grow your business. Pay close attention to the steps above, take action, and be consistent in your email marketing campaign.


Source

Thursday, 9 November 2017

4 Ways to Instantly Grow Your Email List & The Tools To Make It Happen


Is your email list growing? If so, by how much? Research shows that successful marketers see 38% list growth every year, that's about 3.2% each month, according to MarketingSherpa.

To be successful, you have to make continuing efforts to grow your email list. But, with so many marketing tasks, finding time to add contacts isn't always easy.

However, there are a few simple ways to keep subscription rates growing without spending a lot of time recruiting.

Here's a look at four ways to grow your email list, along with a list of tools to make it so easy you can almost "set it and forget it."

1. Add a signup form to your website to grow your email list

One of the best ways to entice visitors to join your email list is through signup forms. You've probably seen them on websites before but might not know what they're called. This is a basic sign up form that's on the American Red Cross website:


grow your email list-signup


This small form sits on a website and gives visitors an opportunity to sign up for a company's emails. It has a basic design that explains what subscribers get for signing up and has a spot for visitors to enter their email address.

Sign up forms can be a little more complex, but the overall point of a signup form is to collect email addresses.

The key to creating a successful signup form is to keep it simple. You should only ask for basic information. Research shows 60% of brands only ask for 2-4 pieces of information per form. In other words, ask for a visitor's name and email address, and maybe one or two additional pieces of information like a hometown or job title.

Tools to create sign up forms

Pinpointe users can create a signup form in a few clicks. Any contacts gained go directly into your Pinpointe account, so you don't have to download any spreadsheets or manually enter email addresses. To set up a signup form on your website, use these simple instructions from Pinpointe.

If you're not a Pinpointe customer, there are additional tools you can use to generate a signup form for your site. Here are a few options:

  • JotForm. Create sign up forms and any other kind of form you can think of including surveys or registration cards for events.
  • Email Subscribers and Newsletters. If you're a WordPress user, this is a simple plugin with high customer satisfaction ratings that you can use to create an email sign up form.


2. Give pop up messages a chance

Pop ups get a bad rap. Brands are hesitant to use them because they don't want to annoy customers or cause them to leave their site prematurely. It's true if you're bombarding your customers with a ton of pop ups as soon as they arrive on your site, visitors will be annoyed.

However, if you use pop ups correctly, they can give your email list a big boost – and won't bother your visitors. How? It's all about using pop up messages at the right time. Here's when a pop should appear:

  • At the end of an article
Once a visitor has finished reading an article on your website or blog, it's a great time to ask for his or her email address. After reading content, visitors are engaged so a pop up that gives them access to more great content makes sense. It isn't intrusive.

  • When a visitor is about to leave
You can trigger pop ups to appear when a visitor is about to leave your site. If they are already on their way out, you know you aren't interrupting their site experience. By showing a pop up, visitors can easily sign up for your email list before leaving. Here's an example:


grow your email list - sample

A pop up should also have a clear, short message. Tell subscribers why they should give up their email address, and consider sweetening the deal with a coupon. For instance, "Join our email list and get 10% off your first purchase."

Tools to create pop ups

There are a lot of pop up tools out there. Here are a few you can choose from:

  • PopUp Domination. This tool is probably the most well-known popup tool. It's easy to use, offers premade templates so you don't need any design or coding skills, and lets you set pop ups to appear when you want.
  • OptinMonster. Another tried-and-true popup tool, OptinMonster gets a lot of acclaim for letting its users place pop ups in a variety of different places like on the side of a website or at the very bottom.
  • PopupAlly. WordPress users can check out this plugin that lets you create pop ups for free. Yes, free. It's a good way to see if pop ups are effective for your site before paying to use a premium tool.


3. Put a sticky top bar on your homepage

Turn website visitors into subscribers with a sticky top bar. What's a sticky top bar? Look at the red arrow below. It's pointing to a small blue bar at the top of this website that says, "Free ProBlogging tips delivered to your inbox" and asks for a visitor's email address. That's a sticky top bar.


grow your email list - sticky top bar

It's "sticky" because it's always there. It doesn't appear when a visitor is about to leave or slide in when a customer makes a purchase. It lives at the top of the page. Period.

Sticky top bars have become quite popular, probably because they're not intrusive and don't take up a lot of space.

To use top bars effectively, you have to create a short message. Space is limited, so you have to choose your words wisely to entice visitors to subscribe. Tell subscribers what they get when they sign up or draw them in with a sweet deal.

You can also create a series of sticky top bars that actually switch while a visitor is on your site. You might have 2-4 different messages on rotation. One might encourage visitors to subscribe to your newsletter, while another asks visitors to sign up for an upcoming webinar.

It's like a mini advertising bar that you can use to promote your business. You can even use the bar to promote a certain part of your website and provide a link to send visitors there.

Tools to create sticky top bars

If you like the idea of a sticky top bar, check out these tools:

  • Hello Bar. This tool is user-friendly and offers targeting tools so you can decide which visitors see the bar. Different users are exposed to different messages, which can help you provide a more personalized site experience.
  • WordPress Notification Bar. WordPress users have access to this handy plugin that lets you use the sticky top bar anyway you see fit. Promote a YouTube video, show a countdown timer for a flash sale or collect email addresses.


4. Add a subscriber box to your email signature

Why not add to your email list as you're sending emails? You can use tools to create an email signature that allows people to subscribe to your list. Take a look at the example below:


grow your email list - signature 

Think about the number of emails that you send every day. By 2019, the average person will send and receive 246 emails, according to estimates from Radicati.

Your personal email list holds a lot of potential. Give the people that you speak with on a regular basis the chance to learn more about your business by adding a subscribe feature to your email signature.

Tools to create an email signature

Email signature tools can turn an ordinary signature into the most eye-catching part of an email. Most tools will incorporate your picture, work phone number, website, social media buttons and an email sign up feature.

Here are several tools you can use to gain subscribers as you create and send emails:

  • Wise Stamp. The go-to email signature tool is Wise Stamp. This tool offers a newsletter app that lets you create a small line of text to encourage email sign ups.
  • Exclaimer. This tool gives you a basic email signature – for free. It doesn't have a specific email sign up button but if you have a signup landing page, you can add that URL to your signature. Granted, it's not as recognizable, but if you're looking for a free tool it can work.


Selecting the right tools for the job

While some of the tools we mentioned in this list are free, most come with a monthly fee. Take a look at each tool, weigh the pros and cons and decide whether or not the fee is worth the investment.

Wrap up

Growing your email list is important. Every new contact can turn into a loyal customer, so taking the time to attract new subscribers to your list can have a big return on investment. Use the tools above to keep your list growing without spending a ton of time to increase sign ups.


Source 

Wednesday, 8 November 2017

Color Theory for Sign Up Form Design


Color tends to trip a lot of “non-designers” up. It can lead to confusion, doubt and, often, poor color combinations.
Besides causing jarring color pairings, poor color choice can make your marketing less effective. (Up to 90 percent of people make decisions based on color alone!)
This is especially true of email sign up forms. To get people to complete your forms, they need to notice them first. And color plays a big role in whether or not visitors see a form on your site.
But here’s the good news: You can easily avoid sign up form color mistakes. With a basic understanding of how colors relate, a design novice can create beautiful color combinations that catch people’s attention.
In this post, I’ll teach you three color theories you can use to choose sign up form colors. Plus, I’ll explain how your brand colors affect the design choices you make. While I’ll be applying the color theories in this post to sign up forms, you can use them for other things too (like your emails, for example!).


Analogous colors provide an easy-to-implement aesthetic

Analogous colors are those that are adjacent on the color wheel. Depending on how many color segments you break the wheel into, this could be blue, green and yellow or even three shades of any one color

This makes the color picking process a little easier. If you find one color you like, you can quickly identify the other two colors you should use just by looking at adjacent colors on the color wheel.
Here’s an example of what an analogous shade approach using three shades of green would look like:


And here’s another example of an analogous family using shades of yellow and green:


If you’re not sure how to find analogous colors, you can use the free tool Adobe Color CC to easily identify them.


Complimentary color schemes feel like smooth jazz

If you’d like to make your forms more interesting, consider a complimentary color arrangement.
Complimentary colors are those that are on opposite sides of the color wheel. For instance, blue and orange, green and red or purple and yellow.

These pairings make for beautiful arrangements, especially when moving away from the primary colors. They are visually appealing and add visual contrast. (We’ll talk about that below.)
Here are some (non-primary) examples of how this could look on a signup form:


To find complementary colors, you can use the same tool I recommended for finding analogous colors: Adobe Color CC.


Contrast silently screams to your audience “Look at me!”

Life would be pretty boring without contrast in it. We’d be stuck in a bland world with limited exposure to life-giving diversity.
When the principle of contrast is applied to sign up forms, your visitors pay attention to what you want them to. This is powerful, as it can lead to something as simple, yet important, as more people noticing your call-to-action button and clicking on it.
There are two ways to utilize contrast in sign up forms:


1. Contrast between the form and the site itself

The idea here is to make the signup form’s background a highly contrasted color from the site itself. This draws the eye to the form naturally. Here’s an example of what that could look like:


2. Contrast within the form

Once you have their attention on your form, your visitor should know exactly what they need to do next – complete the form! To make this more likely, both the form fields and the button should be very noticeable. Contrast has a lot to do with this.
Notice how this form example below uses contrasting shades of black, yellow and white to draw the eye to the form, the fields and the button all at once:


And if you chose to use complimentary colors, this is a great opportunity to make your button and form background both compliment each other yet contrast. There’s no quicker way to say “click here” than with color!


But what about my brand?

That’s a great question! When it comes to applying these concepts to an existing brand aesthetic, there may be hesitation or misunderstanding on how the two can coexist.
If you already have established brand colors, no fear! The most complex and the simplest brand color schemes can apply these principles. How? By accepting that sometimes you’ll need to break free of a brand color to choose the right colors.
Or, you may realize that a new color should be added to your brand to adapt to the way your site is growing and changing.
Picture a brand as a person. Over time people change. There’s nothing inherently wrong with that. I don’t wear the same styles today that I did five or 10 years ago, but people still know who I am.
In the same way, your brand should also be flexible enough to weather time. Adding a new color on your site outside of your brand standards document might just begin a new, better era for your business.
If you’d like to use new colors that work with your brand colors but you’re not sure how to choose them, try Coolors. With Coolors, you can add your brand colors to a palette and the tool will choose colors that work with them.


Unlock the designer within

Whether you’re struggling to get your first sign up form created or performing your hundredth split test, try using some of these principles today. I hope they unlock the designer in you and help you design beautiful, converting forms.

Want to learn how to turn ordinary sign up forms into extraordinary ones that convert more visitors into subscribers? Join our free video course “Email List Growth Blueprint.”


Source

Monday, 9 October 2017

How to Optimize Your Subscriber Experience with Redirect Pages


Many bloggers believe that once your subscriber has clicked the buy button, your job is finished. You’ve nurtured them from reader to subscriber and finally to customer. You’ve accomplished your goal to get them to buy a product and that should be it. On to the next reader, right?
The disappointing truth is that too many bloggers believe this scenario. Whether it’s because they’re busy and always working on the next project or they honestly don’t know the benefits of following through, the truth is they’re missing out on a really big opportunity to continue interacting with that new customer and creating a memorable, enjoyable, and overall engaging experience.
Creating an engaging customer experience should always be at the forefront of your mind. As much as your products help you win over customers, the experience they have with you and your brand also plays a major role in whether or not they come back for more.
The copy you write, the value-packed sequences you create, and every social media post all add up to your customer experience. But there’s one area that most bloggers completely overlook when planning out customer experience– redirect pages.

How you can use redirect pages to optimize the subscriber experience

Out of all the people who see your blog, the ones that sign up for your newsletter, attend your webinars, and buy your products are the most valuable. They’re there because they want to be. They’re looking for something- help, information, products, guidance- and they’ve come to you.
You’ve got a captive audience with these subscribers, and now that you have their attention you need to leverage it. That means top to bottom, you need to find every little space for interaction you have with them and make it more readable, more exciting, more inviting, and more you. Doing this will give your subscribers more opportunity to build trust with you and see you as an authority.
This is also your chance to surprise and delight your subscribers. When they’re least expecting it, your redirect pages can be the perfect place for a free download, a discount, a new way to communicate with you, or even a way to turn a not-so-happy customer back into a raving fan.

How to optimize your Thank You pages for subscriber experience

Thank You pages are typically where you send a subscriber after some kind of conversion- filling out a form, subscribing, buying a product, etc. It acts as a confirmation so your subscriber knows their request was completed and can sometimes deliver your promise of a link for an eBook download or a further link into a webinar they signed up for.
There are endless ways to optimize the subscriber experience with your Thank You pages. Here are a few:

Help them get to know you more

More than whether or not a product is good, people are always looking to relate and identify with something. They want to feel part of the bigger picture and they want to know where things are coming from. With that in mind, use your Thank You pages as a ways to inject your personality.
Give your audience a face and personality to have a human-to-human interaction with. Be funny, be sarcastic, make a joke, post a GIF-whatever it is- you do you. Keep building your relationship with your audience right then and there.
Think Creative Collective shows their personalities with cutesy language.
Show your personality in your redirect pages
Redirect page from ThinkCreativeCollective.com

Point them in the direction of more good stuff

Make it easy on your new subscriber to love you and use your Thank You page as a way to direct them toward even more information they might want. You can make your page a directory of all your other free downloads or a table of contents to your most popular blog posts.
Elle & Co use this Thank You page as a chance to offer up a collection of tools that will help their customer take the next step in organization.
How to use a redirect page
Redirect page from ElleandCompanyDesign.com

The Upsell

If a reader has just purchased something from you, it’s likely they will buy even more. Give them that opportunity right out of the gate and catch their eye with an impulse buy by recommending similar products like the one they just purchased or some of your best sellers.
At AsianEfficiency, they add a countdown clock for a special offer to get customers to make another purchase.
How to use a redirect page
Redirect page from AsianEfficieny.com
This upsell can also happen even if the subscriber has downloaded a free incentive instead of purchasing a product. Your Thank You page for your downloads could become a sales page for your lowest priced product. If they click through this upsell, they’re qualifying themselves as someone who would pay for your products and then you can feel confident in sending them through a sequence to pitch a higher priced product.

How to optimize your Unsubscribe pages for subscriber experience

Just because they’ve clicked your unsubscribe button doesn’t mean you’ve totally lost them yet. There are ways to bring a customer back from the brink if you play it smart.
Did you mean it?
Unsubscribe buttons are often hit because the subscriber is bogged down by the amount of emails in their inbox. It’s possible they’ve forgotten or aren’t sure who you are or even accidentally bulked you into their list of emails they want to unsubscribe from. In those cases, it might just take a quick message to make sure they meant to unsubscribe.
You can simply ask if they meant to hit unsubscribe, write a little message reminding them about who you are, what your mission is, and then give them an option of continuing to unsubscribe or resubscribe to your list.
Feedback survey
While these unsubscribes do hurt a bit, you can make the most of it by asking for feedback. Your subscriber will appreciate that you’re reaching out to find out what they didn’t enjoy or were missing with your product/service and you’re getting free feedback on how to improve your business for your other customers.
This can easily be done by adding a survey to your Unsubscribe page. It could be as simple as a fill in the blank where you ask for feedback on what went wrong or you could create a dropdown menu of options for the reader to choose from.
Option to re-engage
There will be some customers who choose to unsubscribe because they don’t quite understand how to use your product/services or why it’s so important. These are the people who need a little extra attention at the beginning.
If you feel up to it, you can offer up a 1×1 communication to help re-engage with these customers. You could simply state your email address or you could offer up your scheduling calendar to get on a call with you. This type of personal interaction can go a long way to turn an unhappy customer into a raving fan.

How to optimize your opt-in confirmation for subscriber experience

Put your best foot forward by creating an opt-in experience that your customers will love. How you use opt-ins to bring new and potential subscribers into your fold and how you continue to use them to communicate with your current subscribers says a lot about who you are as a blogger and business owner.
A simple way to optimize the customer experience with your opt-in confirmation in ConvertKit is to tailor the content for each form and then the content for the confirmation email. By default in ConvertKit, your form will take a basic look. For the sake of example, let’s me show you how to customize a Minimal form.
This is the default look of your form:
Image of a default form in ConvertKit
To be more eye-catching and engaging for your reader, there are a couple easy pieces you can customize. You can easily edit the title, button text, and the text, accent, and button colors
how to customize your opt-in form in ConvertKit

To change the confirmation message you send your reader to receive their download, go the the Incentive Email tab and make your customization there.
How to optimize your incentive email
If you don’t have an opt-in incentive
It seems pretty simple that the way to optimize your opt-in confirmation when you have a content upgrade or incentive is to deliver on your promises quickly and efficiently. But what if you’re not offering an incentive?
If you have a newsletter opt-in form that doesn’t offer any other opt-in incentive, I highly suggest creating some kind of extra information for your confirmation page.
You can make it as simple as introducing yourself more to your new subscriber like Nutrition Stripped does for their newsletter confirmation opt-in.
How to use your redirect pages
Redirect page from NutritionStripped.com
Or you could offer multiple options for the subscriber to choose from that helps you know more about them. For example, you could use the redirect page to ask the question, “What are you struggling with right now?” to find out where the reader is in their skill level and knowledge of your topic. Each option you provide is a link that triggers them into a sequence where you offer valuable, targeted information and eventually pitches your lowest entry product.

Ready to optimize your redirect pages?

Don’t let your redirect pages be a dead end. There’s an opportunity here to add your flair to these pages and optimize your customer’s experience through pitching them a new product you think they’ll love, asking a question, or even just adding a little humor to their day. Your readers are worth the extra effort, right?
What redirect pages are you going to work on first? Let’s talk about it in the comments.

Friday, 6 October 2017

12 Places For Your Email Opt In (besides your sidebar)


As you may already know if you’ve hung around ConvertKit for a while, we get a little excited about nerdy cool ways to increase opportunities to build your email list. And while overall audience numbers continue to grow thanks to followers, likes, retweets, and favorites, building a solid email list remains the number one way to lay a strong foundation for your business.
It’s often said that the average blog conversion rate is 1.5-3% (meaning 1.5-3% of the people who visit your website become subscribers to your email list). Depressing? Maybe not if you have 35,000+ page views each month. But what if you have 6,000? Or 1,000? Or 500? That percentage starts to look like smaller and smaller numbers on the conversion side and that fact alone can keep any blogger up at night.
We like you to get your sleep (you need it since you’re running a badass business) so let’s pump that average conversion rate up a bit, shall we? Here’s a fun fact: ConvertKit users consistently see high conversion rates (with landing pages converting at 10%-40%!). How is that possible? 2 things:
  • Their forms are clean, easy to use, and look really pretty (here, a little vanity is okay)
  • They use a variety of forms in unique, inventive ways
It’s fairly common knowledge that sidebar opt ins convert really well. If you’re looking for a place to start with your opt in form, start there. Ideally, you’re building out a strong foundation for your email list with multiple opt in box locations. (Some real quick math: more locations + more eyes on your opt in = more conversions) Not sure where else to look? Try one of these options:

After blog posts

Think about your favorite blog posts. You’re reading and scrolling and reading more. You’re having ah-ha moments and high-fiving the screen. You get to the end of the post and you want more. So you hit up the comments section and maybe tap the share button on your favorite social network, but really you wish you could do more. So off you go looking for an opt in box so you can get on their email list and never miss a thing.
Now imagine your readers on your own site. They have that same love and excitement at the end of one of your posts. You have a captive audience and, since you’re a smart cookie, you offer them an opportunity to opt in to your email list right then and there. They’re stoked! No need to scroll and click around looking for that opt in box since you’re providing one right there. How nice of you!
Look at how ConvertKit user Nina Hendrick makes it happen on her blog below.
everyday enchanting

With content upgrades

Nathan wrote about this one a few months ago and it bears repeating. If you haven’t yet tried content upgrades at the end of your blog posts, you could be missing out on some crucial moments to engage with your audience.
Remember that super-excited-ready-to-take-action reader from above? Imagine you’re now offering the downloadable checklist of the exact steps you’ve just outlined in your post. Or a printable recipe for the cake you’ve just described. Or the templates for the note-taking system you’ve laid out. Those, my friend, are content upgrades and they are the incredibly valuable little add-ons your readers have been searching for. Asking for their email address in return is more than reasonable.
Bonus points here: content upgrade subscribers are often the most engaged subscribers on your list. Get them into the right email sequence after they sign up and you could find yourself in touch with some of the most powerful consumers of your products and services.
nathan barry

At checkout in your shop

When your customers checkout from the product side of your business, you typically grab their email address to send them a receipt. ConvertKit integrates with WooCommerce to allow for a checkbox so your purchasers can choose to get your newsletter. You could also automatically add them to your email list like Kim Sorgius is up to over at NotConsumed.com.
not consumed

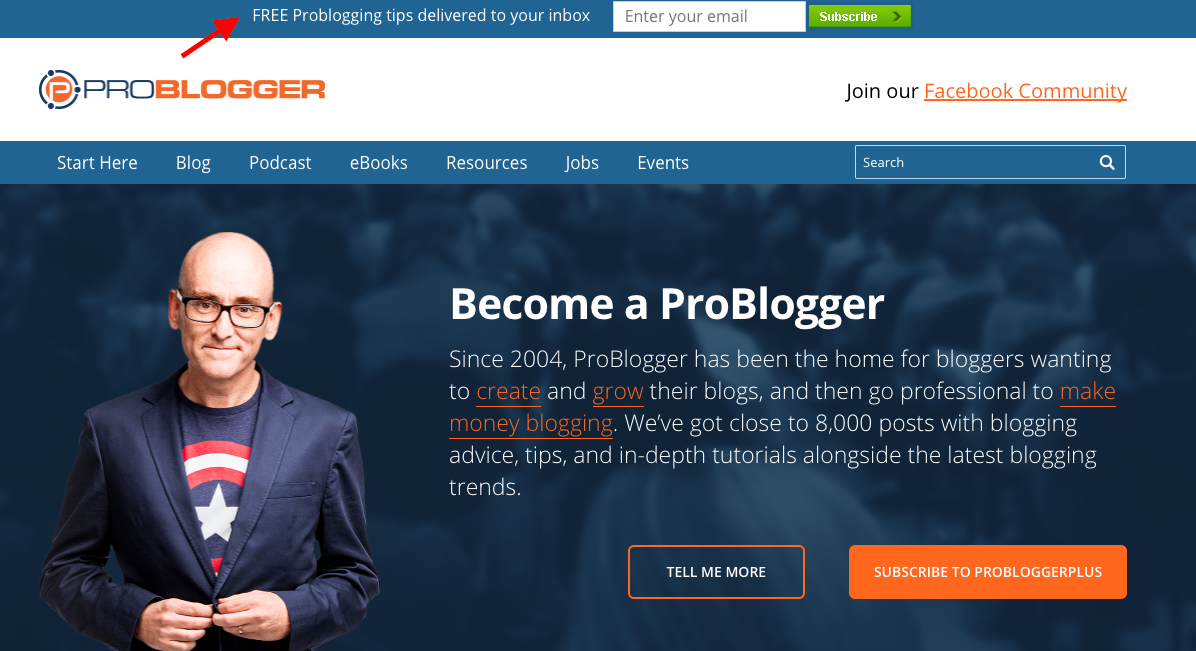
In a homepage feature box

The homepage falls into one of the top 5 pages visited on a website, especially by new visitors. Using a feature box on your homepage directs those new visitors to join your email list.
A clear call to action in a well designed feature box can have a big impact on your business. The call to action may or may not include an opt-in freebie (like Barron Cuadro’s Lean Wardrobe eGuide shown below).
effortless gent

On a custom landing page

A custom landing page is useful for so many reasons. Your reader is focused on the single task of signing up to your list without distractions, they are already highly engaged to be on that page in the first place, and they’re just so clean and user-friendly! We find them so useful, in fact, that we make it possible to build landing pages right inside your ConvertKit account. You can host them with us or on your own WordPress website (via our plugin) or even with one of our integrated products like LeadPages.
We have one our customer success team is pretty proud of:
convertkit webinar

In your website footer

Scroll, scroll, scroll, scroll…. hello footer. Don’t let your footer be an afterthought with a few social buttons and a copyright disclaimer. Our eyes and brains naturally come to rest when we scroll to the bottom of a page so take advantage of that brief moment of pause and invite your scroller, er, reader to subscribe to your email list.
It’s a little-used bit of virtual real estate but one with a big impact. See how Patt Flynn makes use of his footer below.
pat flynn

On your Facebook page

Think Facebook Pages are dead since the algorithm changed earlier this year? Think again. Facebook Pages are alive and well. The reach might not be the same as it used to be, but your readers, fans, and followers still find themselves on your Facebook Page from time to time and you can use that to your advantage.
If you don’t already have a call-to-action button enabled, go get one now. When your fans click that handy button at the top of your page (seen below on Claire Pelletreau’s Facebook Page) they are directed to a page of your choosing (might we suggest a ConvertKit landing page?) to get themselves added to your email list.
Facebook is one of the most powerful social media platforms. Are you making the most of it?
claire pells
….which leads to….
claire pells part 2

As a Twitter card

Twitter cards are one of our favorite secret weapons here at ConvertKit. They’re simple to add right from any form in your account and they can have major impact.
A Twitter card is a one-click sign up option inside of Twitter. Offering a free course or e-book? Invite your Twitter followers to get involved by clicking the button and signing up to your email list without ever leaving Twitter. Paul Jarvis always has a Twitter card pinned to his page and his list grows every single day. Coincidence? We think not.
paul jarvis

On your contact page

If there is a page on your website where a visitor is more primed to be in touch with you than your contact page, please show it to us. Seriously, nothing says “I want to hear from you!” than a click on over to your contact page.
Make it easy for your visitors to continue to get your emails by adding a checkbox to your contact form (like Mike Vardy does on Productivityist shown below) or add a full opt in form on that same page. You could even take it up a notch and add that opt in form to the thank you page that your viewers hit once they’ve completed the contact form. Have fun with this one. After all, they’ve expressed they want to be in touch with you so the fun had already begun!
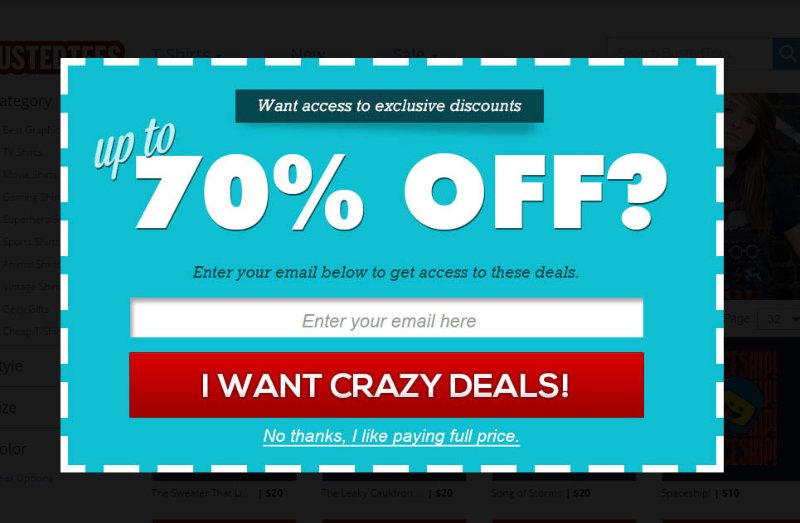
productivityist

In a popup box

For better or for worse, pop up boxes convert. In fact, depending on your settings, pop up boxes can triple or even quadruple your conversion rates.
Pop up boxes certainly get a bad rap, though. In fact, most people hate them. Why? They are notorious for showing up the second you land on a site, reappearing every time you navigate to the same page (even after you’ve already subscribed), and then there are the pop ups you can’t X out of. Terrible.
We take a friendlier approach to pop ups at ConvertKit. With our optimized pop ups, you can choose if you want to have it show after a set period of time (like Abby Lawson does with her pop up shown below), once the reader has scrolled a particular percentage down the page, or if you’d prefer to wait until they show intent to leave the site. You can also keep the pop up from showing to the same visitor every time they land on your site. These nicer approaches to pop ups make them even easier to implement on your site and test the conversions out for yourself.
girl and her blog

On a slider

So if pop ups are the brassy and bold playground bully of conversions, sliders are definitely the much more polite kid who wants everyone to play nicely together and maybe share some Oreos after recess.
With a slide-in opt in box, otherwise referred to as a “slider”, you’re able to trigger an opt in box to appear at a set time period and in a discreet location. ConvertKit has the ability to add sliders to your opt in game plan and you get many of the same features of a pop up (scroll percentage, time spent on the page) without the abrupt nature of a standard pop up.
Take a look at how ConvertKit user Dennis Field utilizes this technique on his blog below.
dennis field

On your YouTube channel

YouTube is the biggest video platform out there, and it’s one of the least-common places bloggers think of to grow their email list. Subscribers? Sure! Email list? Hmmmmm. Now’s the time to turn those YouTube Subscribers into Email List Mega-fans. If YouTube is how you reach your audience, make use of that channel to get people onto your email list.
Amy Schmittauer runs Savvy Sexy Social on YouTube and invites her 37,000+ YouTube Subscribers to join her email list by making use of YouTube cards and custom landing pages. When you watch her videos and click on a card at the end, you’re directed to a brief landing page that collects your email address in order to get the free gift she offers on the video. She also has one of these handy subscribe buttons on her main YouTube page for any visitors who are subscribed to her channel. Now that’s savvy.
savvy sexy part 2

….which leads to this landing page….
savvy sexy part 3

On your about page

Your About Page also hits that “Top 5 Most Visited Pages” list on your website, so adding a call to action on a page with tons of eyeballs on it is a smart move. As your readers get to know you better, their mind starts to wander to how you can help them, what they can get from you, and maybe that cat video they meant to watch earlier. Keep them on your site and away from cat videos with an email opt in right on your About page.
Putting this particular call to action in the middle of your story, like Krista Stryker does below, or at the bottom of the page. Or go crazy and throw it on the top of the page as a welcome mat. No matter where you place it, having an opt in box on your About page increases email signups and maximizes your conversions.
12 minute athlete


While there are probably at least 5 other places you can add your email opt in for maximum conversions, this list ought to get you off to a good start. How many of these tactics are you implementing already? Which one (or two) will you add to your game plan? Let’s hash it out in the comments below and increase email opt in conversions around the world this week.